About This Book
This book teaches API testing with Postman from the ground up — no prior testing experience required, though readers who already test software will move faster. By the final page you will be able to design, build, run, and automate a professional API test suite, integrate it into a CI/CD pipeline, and use AI assistance productively and safely.
How the book is organised. Part I builds the conceptual foundation: what APIs are, how HTTP works, and why API testing matters. Part II covers the Postman essentials — workspaces, collections, requests, and responses. Part III is the heart of the book: writing tests, mastering variables and environments, advanced scripting, and designing a genuine test strategy. Part IV scales your work across a team with sharing, the Collection Runner, mock servers, and monitors. Part V moves everything to the command line and into CI/CD with the Postman CLI, Newman, Jenkins, and GitHub Actions. Part VI addresses the newest chapter in our profession: AI-assisted testing. Part VII is pure reference — an interview FAQ, an HTTP status code table, and a glossary.
Conventions. Numbered steps are actions for you to perform. Code blocks show JavaScript, terminal commands, or YAML exactly as you should type them. Values in {{doubleCurlyBraces}} are Postman variables. Callouts marked Best practice, Security note, or Pitfall flag the judgement calls that separate a working test suite from a professional one.
About the screenshots. Postman ships updates frequently. Some screenshots in this book show slightly earlier versions of the interface; where a menu or tab has been renamed, the text tells you the current name. The workflow and concepts are stable — a button may move, but the skill transfers.
Trademarks. Postman is a trademark of Postman, Inc. Jenkins, GitHub, Node.js, and all other product names mentioned are trademarks of their respective owners. This is an independent publication and is not affiliated with or endorsed by any of them.
Part I — Foundations
Before touching a tool, a professional understands the thing being tested. This part builds that understanding: what an API is, how an HTTP conversation actually works, and what "testing an API" really means. If you already live and breathe HTTP, skim Chapter 1 for the testing-specific framing and move on — but most readers, including experienced UI testers, find this the chapter that makes everything afterwards click.
Understanding APIs and API Testing
What Is an API?
An Application Programming Interface (API) is a contract that lets one piece of software use another. When a mobile app shows you today's weather, the app itself knows nothing about meteorology — it sends a request to a weather service's API and displays the response. The API sits between the client and the system's data and functionality: the client sends a request, the API receives it, the system retrieves or manipulates the appropriate data, and a response travels back.
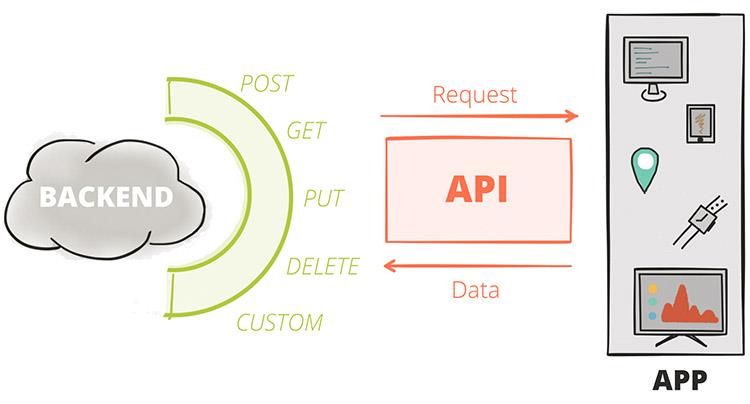
The dominant style for web APIs is REST (Representational State Transfer). A REST API exposes resources — users, orders, products — at URLs called endpoints, and clients manipulate those resources using standard HTTP methods. REST's genius is its uniformity: once you can test one REST API, you can test essentially all of them, because they all speak the same protocol. (You will also meet GraphQL, gRPC, SOAP, and WebSocket APIs in the wild; Postman supports them all, and the testing mindset in this book transfers directly.)
Anatomy of an HTTP Request
Every HTTP request has five key elements, and a tester should be able to name all of them, because each one is something that can be wrong:
- Method — the verb describing the intended action. The essential set: GET retrieves a resource without changing it; POST creates a resource (or triggers an action); PUT replaces a resource entirely; PATCH modifies part of a resource; DELETE removes it. Method semantics matter for testing: GET and PUT are meant to be idempotent (repeating them changes nothing further), while POST typically is not — send the same POST twice and you may create two records.
- URL / URI — identifies the resource, for example
https://api.example.com/v1/users/42. Query parameters ride at the end of the URL after a?, as in/users?page=2&limit=50. - Headers — metadata as key–value pairs: what format the body is in (
Content-Type: application/json), what format the client will accept (Accept), authentication credentials (Authorization), and dozens more. - Body (payload) — the data being sent, present on POST, PUT, and PATCH requests. In modern APIs this is almost always JSON: human-readable text of nested objects, arrays, strings, numbers, and booleans.
- HTTP version — usually invisible in daily work, but part of every exchange.
Anatomy of an HTTP Response
The response mirrors the request with four elements:
- Status code — a three-digit number summarising the outcome. The first digit is the class: 1xx informational, 2xx success (200 OK, 201 Created, 204 No Content), 3xx redirection, 4xx client error (400 Bad Request, 401 Unauthorized, 403 Forbidden, 404 Not Found, 429 Too Many Requests), 5xx server error (500 Internal Server Error, 503 Service Unavailable). Status codes are a tester's first assertion in nearly every test — the full reference table is in Appendix A.
- Headers — metadata about the response: content type, caching directives, cookies being set, rate-limit counters.
- Body — the requested data or the error detail, again usually JSON.
- HTTP version.
A useful habit from day one: read responses like a tester, not a user. A 200 OK wrapping a body that says "error": "database unavailable" is a bug twice over — wrong behaviour and wrong status code — and only a tester who checks both layers will catch it.
What Is API Testing?
API testing verifies a system's behaviour at the API layer — beneath the user interface, above the database. You send crafted requests and assert on what comes back: the status code, the response structure, the data values, the headers, and the response time.
Why test here, rather than only through the UI?
- Speed. An API test completes in milliseconds; a UI test drives a browser for seconds. A thousand-test API suite can run on every code push.
- Stability. APIs change far less often than screens. UI tests break when a button moves; API tests break when behaviour actually changes — which is what you want.
- Earlier feedback. The API exists before the UI does. Testing it directly finds defects while they are cheapest to fix.
- Coverage the UI cannot reach. Malformed payloads, missing fields, expired tokens, concurrent updates, rate limits — the UI shields users from these paths, but attackers and integrations will find them. API testing is where they get exercised.
In the classic test pyramid, API (service-level) tests occupy the broad middle tier: more numerous than end-to-end UI tests, more integrated than unit tests. Teams with a healthy pyramid catch most regressions in seconds, at the API layer.
The Kinds of API Testing
One tool, many disciplines. Over this book you will practise several distinct kinds of testing, all through Postman:
- Functional testing — does each endpoint do what the specification says, for valid and invalid inputs alike? This is the core of Parts II and III.
- Contract testing — does the response structure (fields, types, formats) match the agreed schema, so that consumers of the API do not break? Chapter 7 covers schema validation.
- Integration and workflow testing — do sequences of calls work end to end: create, then read, then update, then delete? Chapter 7 covers chaining requests.
- Regression testing — does everything that worked yesterday still work today? This is what automation (Parts IV and V) exists for.
- Performance testing — does the API stay correct and responsive under load? Chapter 10 introduces Postman's performance runs.
- Security-adjacent testing — do authentication and authorisation actually gate access? Do error messages avoid leaking internals? Threaded throughout, especially Chapters 4 and 8.
Meet the Practice API
The hands-on examples in this book use JSONPlaceholder (https://jsonplaceholder.typicode.com) — a free, public fake REST API that needs no signup and never holds real data. Its /users, /posts, and /comments endpoints respond exactly like a real service. (Older tutorials, including this book's first edition, used practice APIs on Heroku's free tier, which no longer exists — if you meet a dead herokuapp.com URL in an old collection, that is why.) Everything you learn transfers unchanged to your own team's APIs; only the base URL differs, and Chapter 6 shows you how to make even that a one-click switch.
Key Takeaways
An API is a contract between software systems; HTTP is the language of that contract; and API testing is the discipline of verifying the contract is honoured — quickly, repeatably, and at every layer of the response. With that foundation, it is time to open the tool.
Getting Started with Postman
Postman began as a simple request-sending extension and has grown into the industry's default API platform: a client for every major protocol, a JavaScript test runtime, documentation and mock-server generators, an AI assistant, and command-line runners that plug into any CI/CD pipeline. It is free to start, runs on Windows, macOS, and Linux, and also offers a full web version at https://web.postman.co plus a VS Code extension. This book uses the desktop app, which remains the most complete experience.
Installing and Signing In
Step 1 — Download and install Postman from https://www.postman.com/downloads/.
Step 2 — Sign up with the required information.
Step 3 — Log in to Postman.
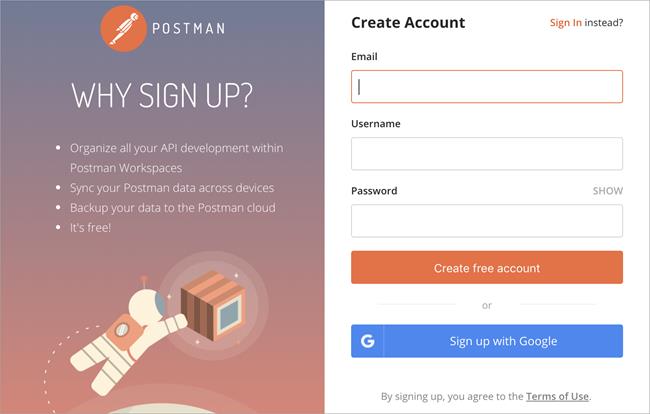
You can use Postman's lightweight API client without signing in at all, but an account unlocks everything this book relies on: cloud-synced workspaces, collection sharing, Postbot (Postman's AI assistant), scheduled runs, and CI/CD integrations. For team work, an account is effectively mandatory.
Security note: enable two-factor authentication on your Postman account the day you create it. Your workspaces will eventually hold request examples, tokens, and internal URLs; the account protecting them deserves more than a password.
A Quick Tour of the Interface
Three regions matter from day one. The sidebar (left) lists your collections, environments, mock servers, monitors, and history. The workbench (centre) is where requests open in tabs — method, URL, parameters, headers, body, scripts. The response pane (bottom or right) shows what came back: body, cookies, headers, and test results. Along the footer you will find the Console (indispensable for debugging — it logs every request Postman actually sent, resolved variables and all) and Postbot, the AI assistant we put to work in Chapter 14.
Create a Workspace
A workspace is your working area: it groups related collections, environments, mock servers, and monitors in one place. Workspaces can be personal, private, team, or fully public — public workspaces are how many companies now publish their official API collections for the world to fork.
Step 1 — From the workspace menu, click on New Workspace and give the workspace a name.
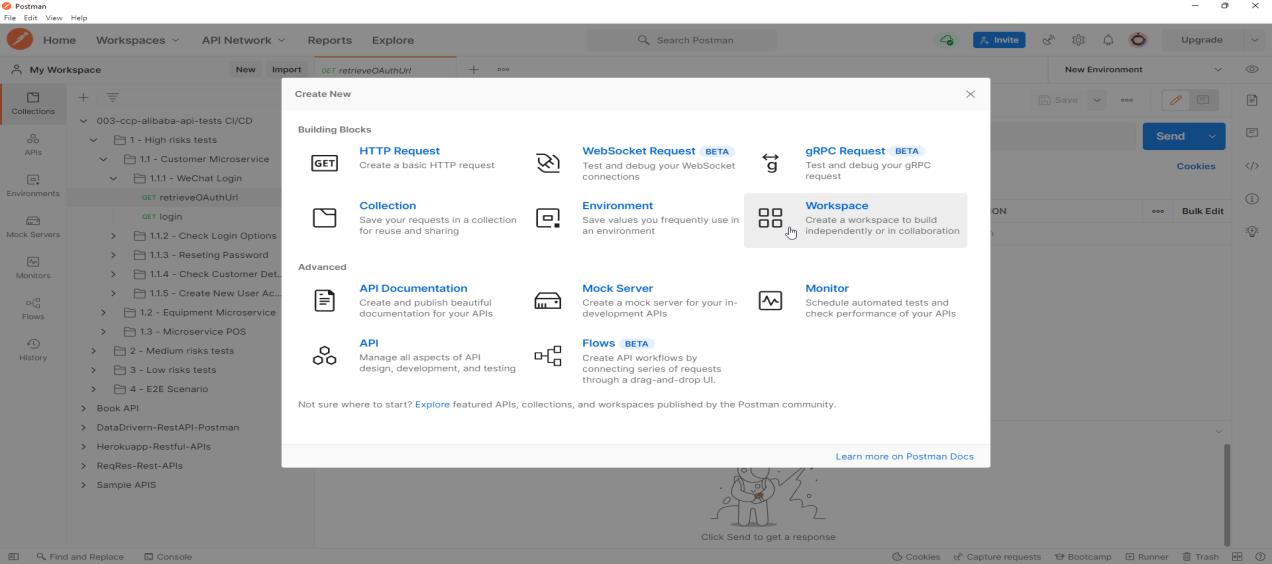
Step 2 — Choose the visibility that matches your situation — Personal while you learn, Team or Private at work — and click on the Create Workspace button.
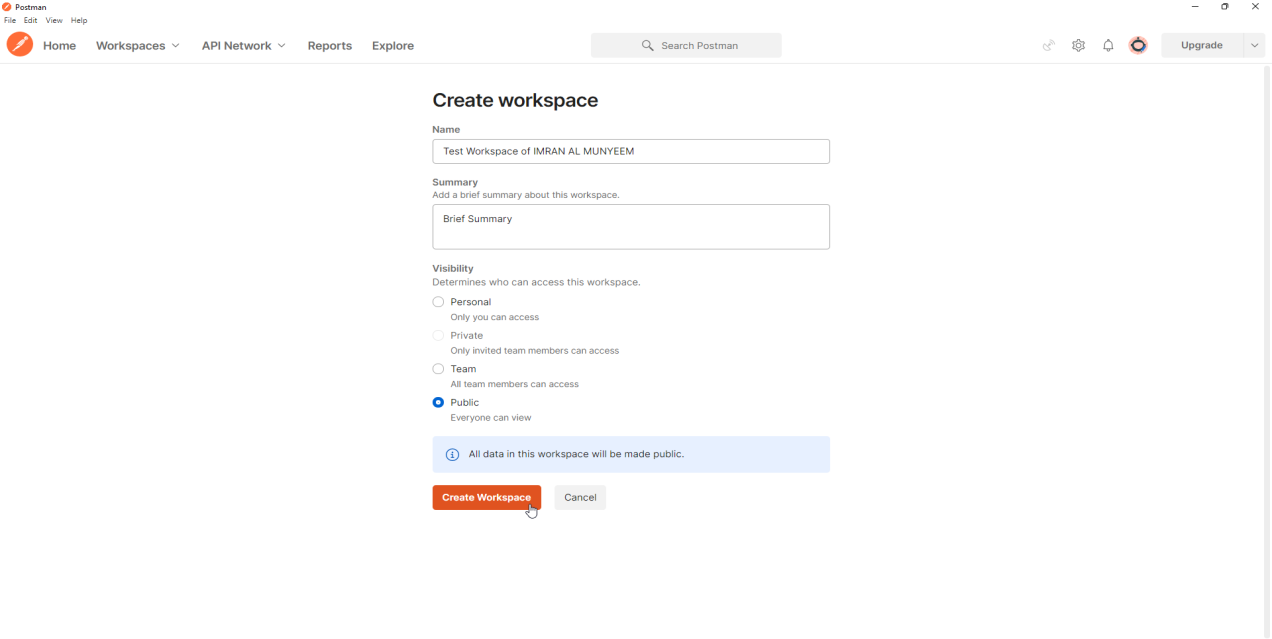
Security note: treat workspace visibility as a security decision, not a cosmetic one. Anything in a public workspace — request URLs, example bodies, any credential carelessly left in a variable — is visible to everyone on the internet, and search engines index public workspaces. Real leaks have happened exactly this way.
Best practice: one workspace per product or team, not per person. The workspace is where collaboration happens — reviews, forks, comments — and scattering collections across personal workspaces is how test suites get lost when people change roles.
With the foundation laid and the tool open, you are ready to build the structures every test suite lives in: collections and requests.
Part II — Postman Essentials
Everything in Postman lives inside a collection, and everything a collection does begins with a request. This part builds those essentials properly: organising collections like the test suites they will become, sending requests with every important method, reading responses the way a professional reads them, and authenticating against protected APIs.
Collections and Requests
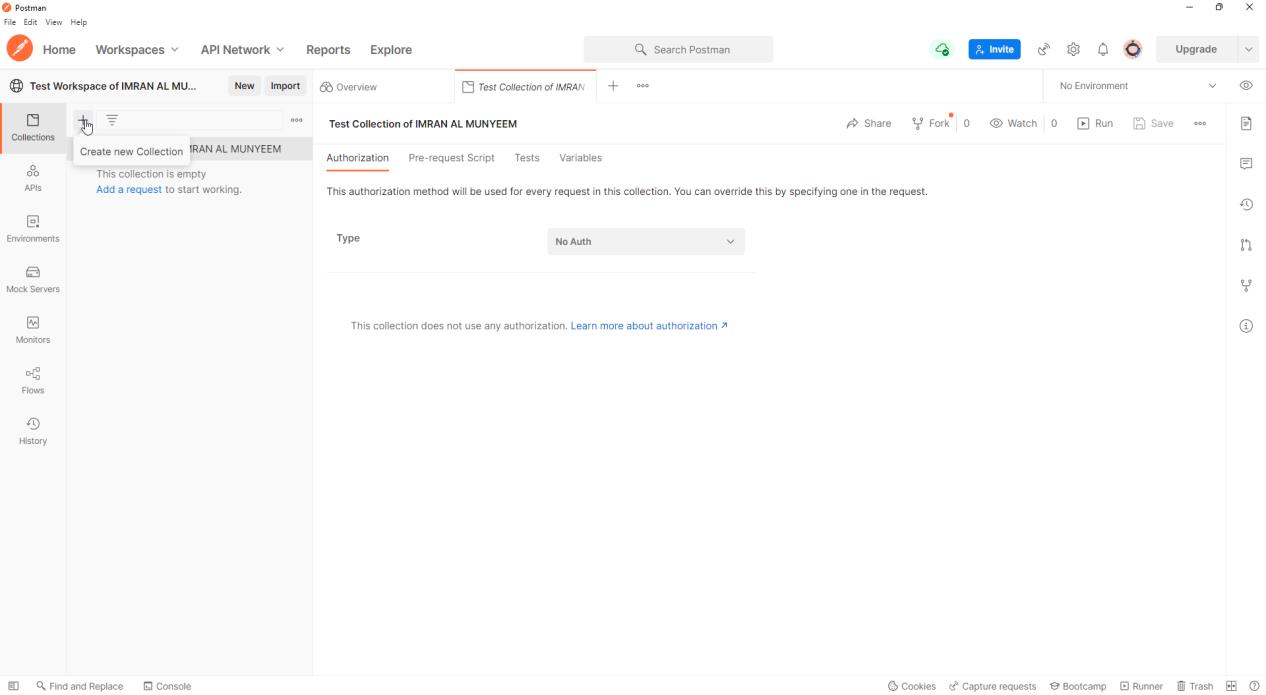
Create a Collection
A collection groups your API requests together so they can be organised, shared, documented, and — most importantly — run as a single automated unit, both inside Postman and from the command line in your CI pipeline. Think of a collection not as a folder of bookmarks but as the test suite it will grow into.
Step 1 — Select your workspace from the list.
Step 2 — Click on the Create Collection button.
Step 3 — Give the collection a name and press Enter.
Add a Request
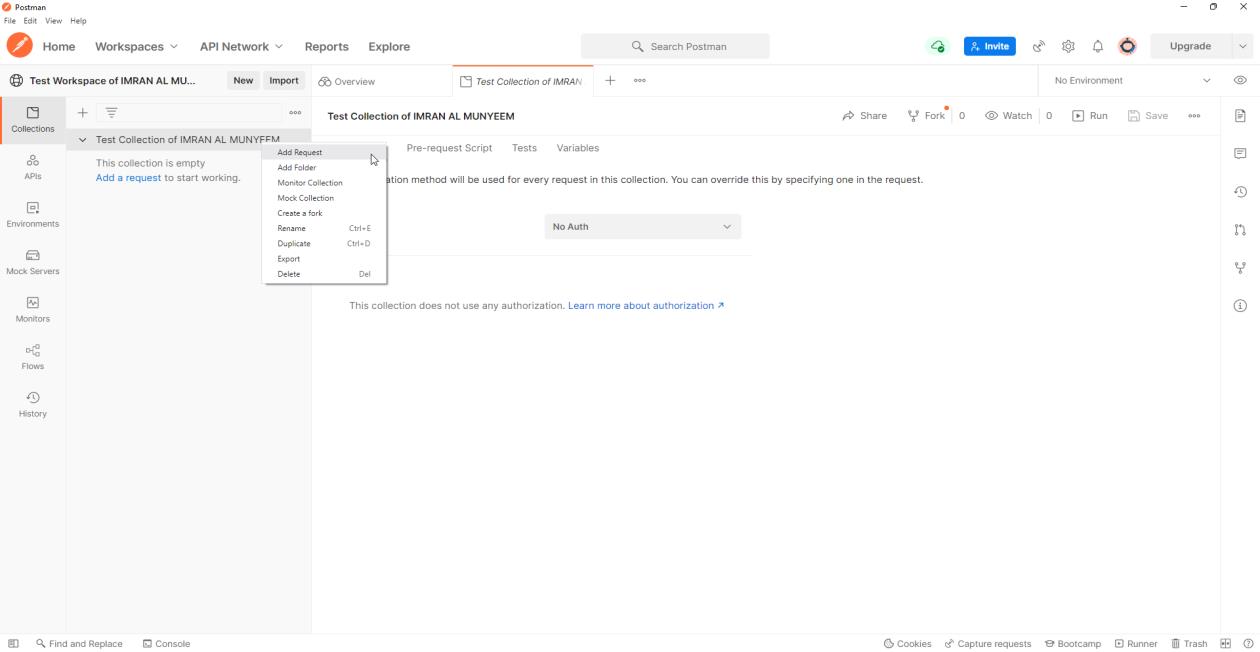
Step 1 — Click on the Add a request link, or right-click on the collection, or click on Add request.
Step 2 — Give the request a name.
Organising a Collection That Scales
The difference between a demo collection and a professional one is structure, and structure is cheapest to add on day one:
- Folders mirror the API. One folder per resource or feature —
Users,Orders,Auth— with requests inside. Folder-level scripts (Chapter 7) then apply shared setup to exactly the right group. - Names describe behaviour, not URLs. "Login — wrong password returns 401" is a test report line;
POST /api/v1/loginis a puzzle. Six months from now, a collection run report full of behavioural names reads like documentation. - Descriptions everywhere. The collection, each folder, and each request accept Markdown descriptions. Postman generates publishable documentation from them automatically, and Postbot can draft them for you — but even one sentence per request pays for itself the first time a new teammate opens the workspace.
- Save examples. After a request returns a good response, save it as an example on the request. Examples power Postman's mock servers (Chapter 11) and show consumers what to expect without their having to call anything.
Pitfall: resist the "one giant collection" temptation. When a collection mixes exploratory scratch requests with the regression suite, CI runs become slow and flaky. Keep a personal scratch collection for exploration and a disciplined, folder-structured collection for the automated suite.
Sending Requests and Reading Responses
This chapter is where testing becomes tactile: crafting requests with each important HTTP method, then dissecting everything the server sends back.
Send a GET Request
Step 1 — Click a new tab to add a new request.
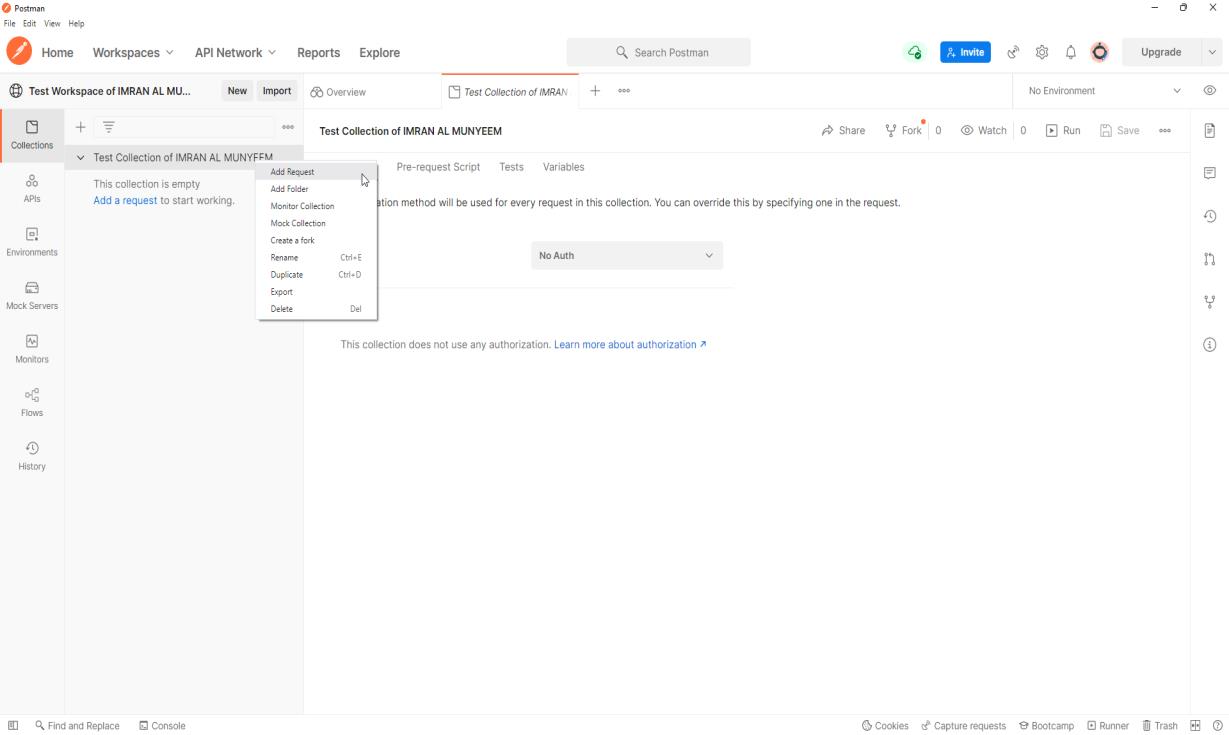
Step 2 — Create a GET request for a REST API endpoint:
- Set your HTTP request method to GET.
- Input the link in the request URL field — for example
https://jsonplaceholder.typicode.com/users. - Click on Send to execute.
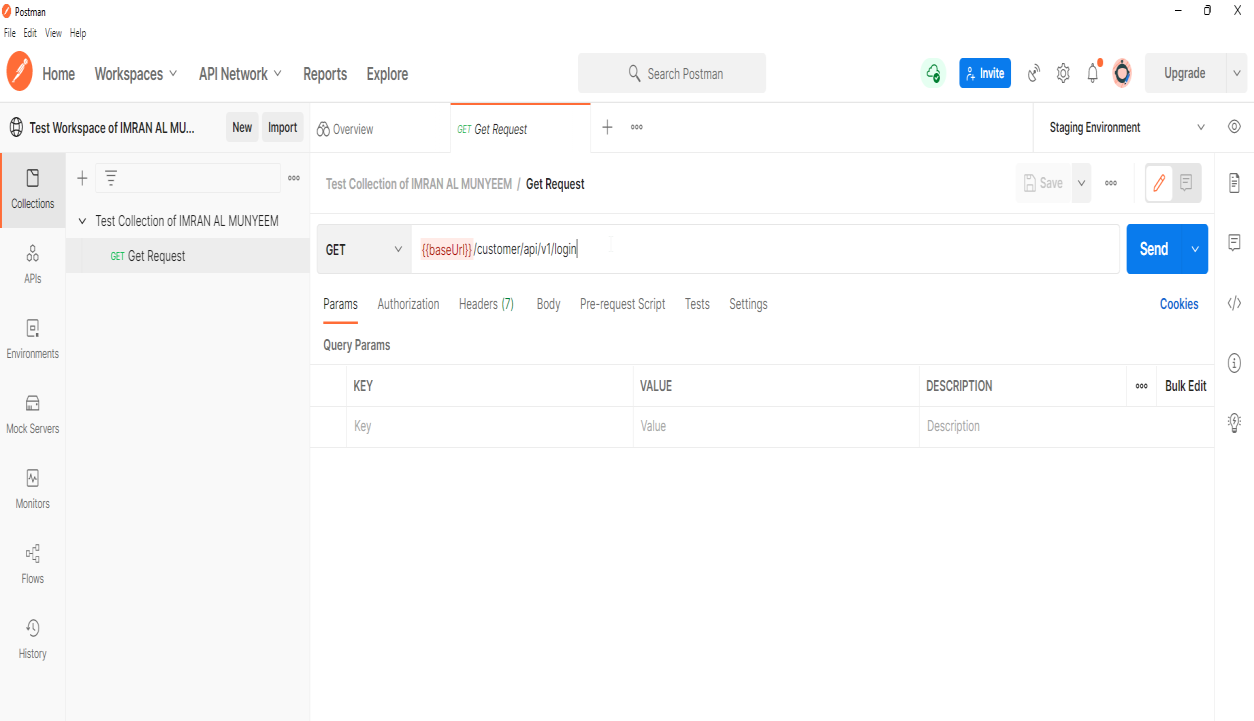
The response arrives in the lower pane: a JSON array of users, plus a status of 200 OK. Congratulations — you have just performed your first API test, informally. The rest of the book makes it formal, repeatable, and automatic.
Send a POST Request
POST requests are used for data manipulation — adding data to the endpoint. Let's add a user to the application. To do this we send data in the body of the request, and the API returns data in response, confirming the user has been created.
Steps:
- Set your HTTP request method to POST.
- Input the link in the request URL field.
- Click on the Body tab, select the raw radio button, then select JSON. Paste a single user object — copying one result from the previous GET request is a quick way to get the structure right.
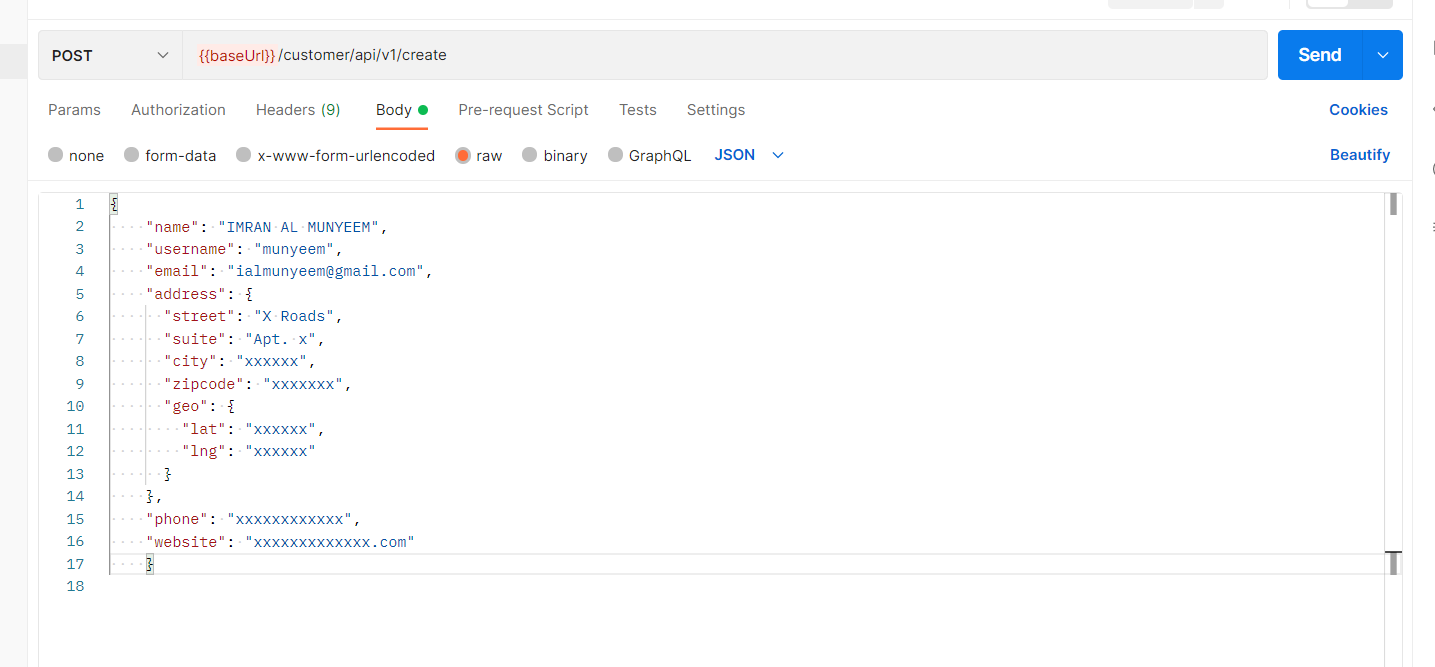
Send it, and note two things a tester always notes: the status code is 201 Created (not a generic 200 — creation has its own code), and the response body echoes the created resource, typically with a server-assigned id. That returned id is the thread we will pull in Chapter 7 to chain requests together.
The Rest of the Method Family
The same pattern covers the remaining methods, and a complete functional suite exercises all of them:
- PUT replaces a resource entirely — send the full object to
/users/1and expect 200 with the replaced resource. - PATCH modifies part of a resource — send only the changed fields.
- DELETE removes it — expect 200 or 204, and then a follow-up GET should return 404. (That follow-up is the real test; deletion that only claims to work is a classic bug.)
Pitfall: JSONPlaceholder, like many practice APIs, simulates writes — your POST returns 201 but nothing is truly stored. Perfect for learning the mechanics; just don't be surprised when a GET doesn't show your new user.
Analyse Responses
After the server responds, the response pane holds far more than the body, and each element is something a test can assert on.
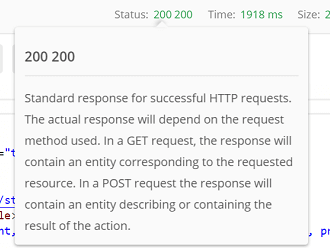
Status code. You will see 200 OK when a GET succeeds. Hover over the status for an explanation of what the code means.
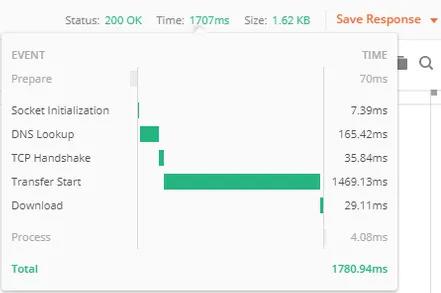
Response time. Hover over the time to see individual components — DNS lookup, TCP handshake, transfer start, download. When an endpoint is slow, this breakdown tells you where the time went, which is the difference between "it's slow" and a useful bug report.
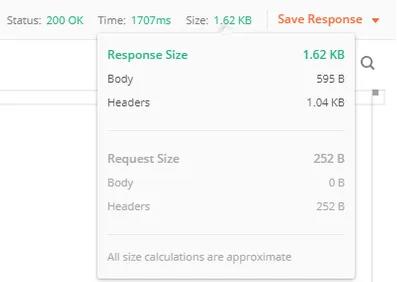
Response size. Similarly decomposed into body and headers. A payload that balloons from 5 KB to 5 MB after a release is a regression even if every field is technically correct.
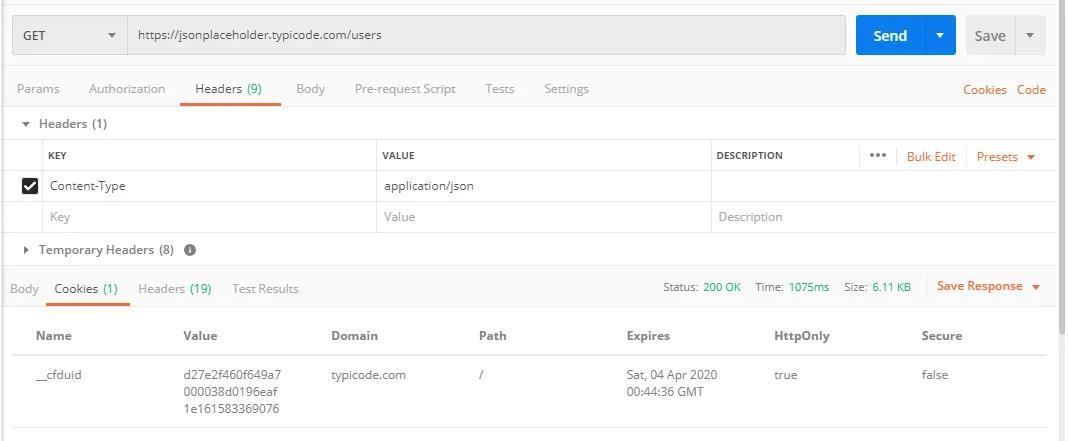
Cookies. Session-related information returned by the server appears in the Cookies tab.
Response headers. Metadata about the processed request.
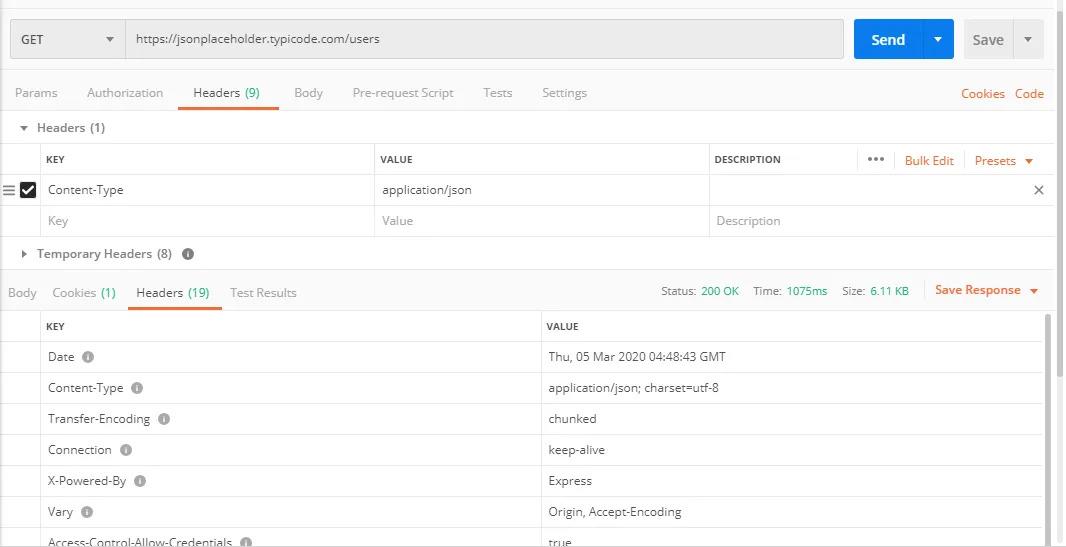
The headers a tester reads first:
- Content-Type — the format of the response, such as
application/json. If your API claims JSON but returns HTML (typically an error page), tests that parse the body will fail confusingly; assert the content type early. - Date — the server's timestamp for the response.
- Server — which server software responded. (Security teams often prefer this header suppressed; noticing it is a small security finding.)
- Cache-Control / Expires — whether intermediaries may cache the response; wrong caching on personalised data is a serious bug.
- Set-Cookie and its expiry — what session state the server is establishing.
Authenticating Your Requests
Real APIs are protected, so your requests must prove who they are. Postman gives you two routes.
The modern way — the Authorization tab. Every request (and the collection itself) has an Authorization tab supporting the schemes you will meet in practice: Bearer Token, API Key, Basic Auth, OAuth 2.0 (with Postman driving the full token flow, including refresh), JWT, AWS Signature, and more. Pick the type, supply the credentials, and Postman constructs the correct header on every send.
Best practice: configure authorisation once at the collection level and let every request inherit it; store the token itself in an environment variable of type secret (Chapter 6), so switching environments switches credentials too.
The manual way — headers. You can also supply credentials directly, which is exactly what the Authorization tab generates under the hood:
- Click on Headers.
- Enter
Authorizationas the key. - Put the credential in the Value field — for example
Bearer eyJhbGci...orToken 96c3fe....
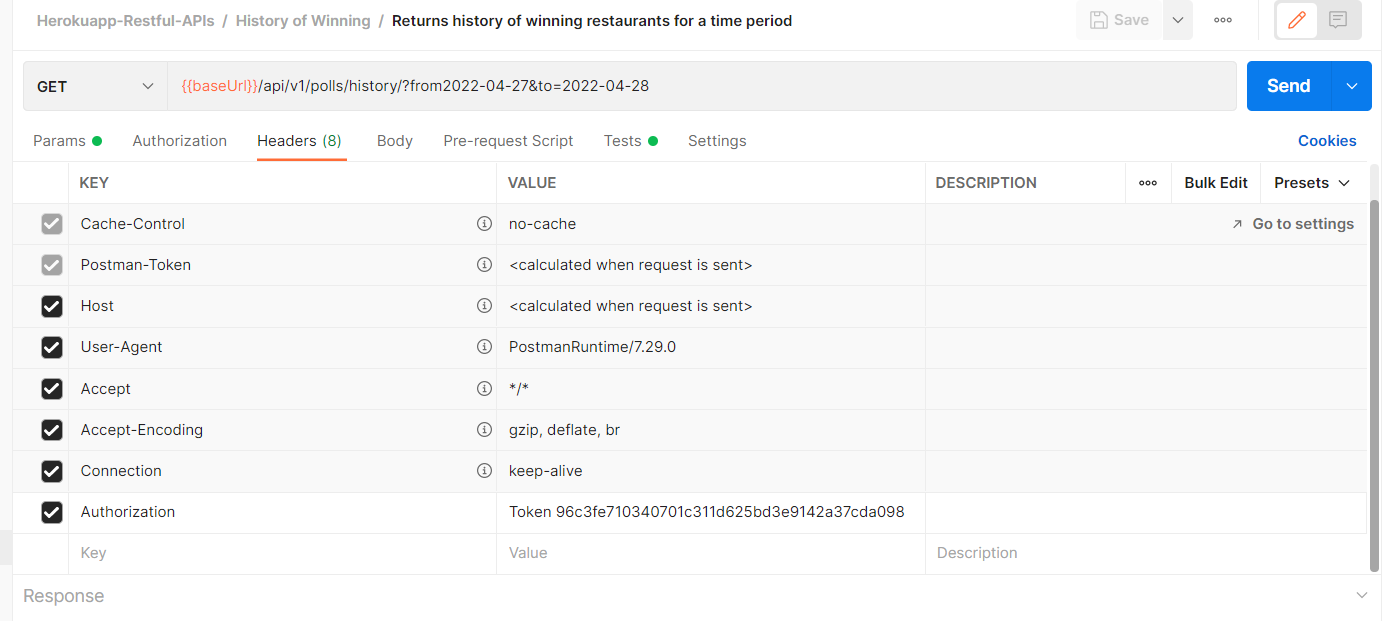
Knowing the manual form matters: it is what you will reproduce when debugging with cURL, reading raw HTTP traffic, or writing client code.
Testing angle: authentication is not just plumbing to get through — it is a test surface. A professional suite always includes the negative cases: no token (expect 401), an expired token (401), a valid token for the wrong user or role (403). Chapter 8 builds these into your strategy.
Key Takeaways
You can now speak full HTTP through Postman: every method, every part of the response, authenticated or not. So far, though, you are the assertion engine — you look at the response and judge it. The next part of the book teaches Postman to judge for you.
Part III — Writing Tests
A request you inspect by eye is exploration; a request that checks itself is a test. This part turns Postman into a test automation framework: your first assertions, variables and environments that make suites portable, advanced scripting for chained workflows and schema validation, and — the chapter that separates professionals from tool operators — how to decide what to test in the first place.
Your First Tests
Postman tests ensure that your API works as expected, that integrations between services function reliably, and that new development hasn't broken existing functionality. A test is a small piece of JavaScript that runs automatically after a response arrives and reports pass or fail.
Where Tests Live Today
In current versions of Postman, the old Tests tab has been reorganised into a single Scripts tab with two sections: Pre-request (code that runs before the request is sent) and Post-response (code that runs after the response arrives). Your tests go in Scripts → Post-response. The screenshots in this chapter show the earlier Tests tab; the snippets, code, and workflow are identical — only the tab name has changed.
Under the hood, Postman's scripting sandbox is JavaScript on a Node.js-based runtime, with the Chai.js assertion library built in — which is why tests read almost like English: pm.expect(value).to.eql(expected). The pm object is your API into everything: pm.response, pm.environment, pm.test, and more.
Your First Assertion: Status Code
Step 1:
- Go to the GET request we created earlier.
- Switch to the Scripts → Post-response tab (the Tests tab in older versions).
- From the Snippets section, click on "Status code: Code is 200". The script is auto-populated.
- Click on Send.
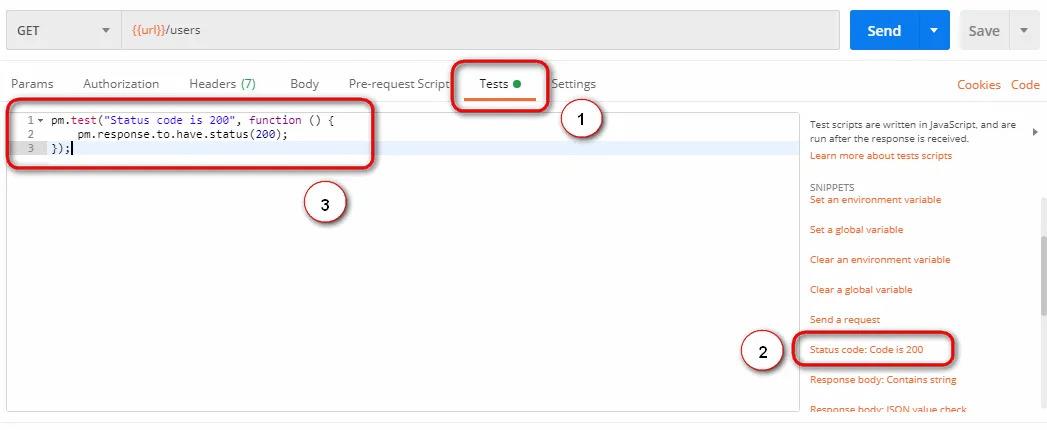
The generated code:
pm.test("Status code is 200", function () {
    pm.response.to.have.status(200);
});
Read it as a sentence: define a test named "Status code is 200" whose body asserts the response has status 200. Every test you ever write in Postman follows this shape — a name, and a function containing one or more assertions.
Comparing Expected to Actual
Now a test with real content: verifying a value in the body.
Step 2:
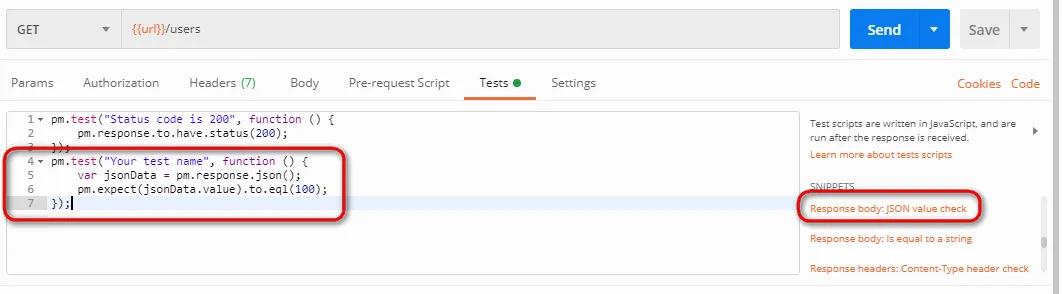
- Click on "Response body: JSON value check" from the Snippets section.
- We will check whether Leanne Graham is the user with ID 1.
Step 3:
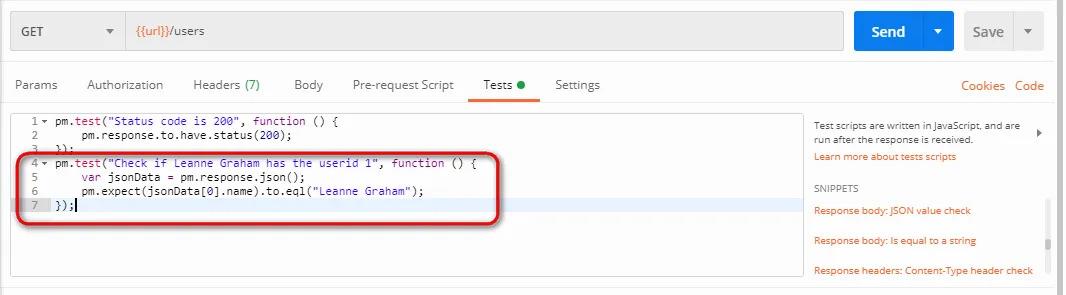
- Rename the test to describe exactly what it verifies: replace
"Your Test Name"with"Check if Leanne Graham has the userid 1". - Replace
jsonData.valuewithjsonData[0].name— the path is visible in the body of the GET response. - Since "Leanne Graham" is the first record, the index is 0; the second record is
jsonData[1], and so on.
pm.test("Check if Leanne Graham has the userid 1", function () {
    var jsonData = pm.response.json();
    pm.expect(jsonData[0].name).to.eql("Leanne Graham");
});
Step 4: Click Send. The Test Results tab of the response pane shows each test with a green PASS or red FAIL.
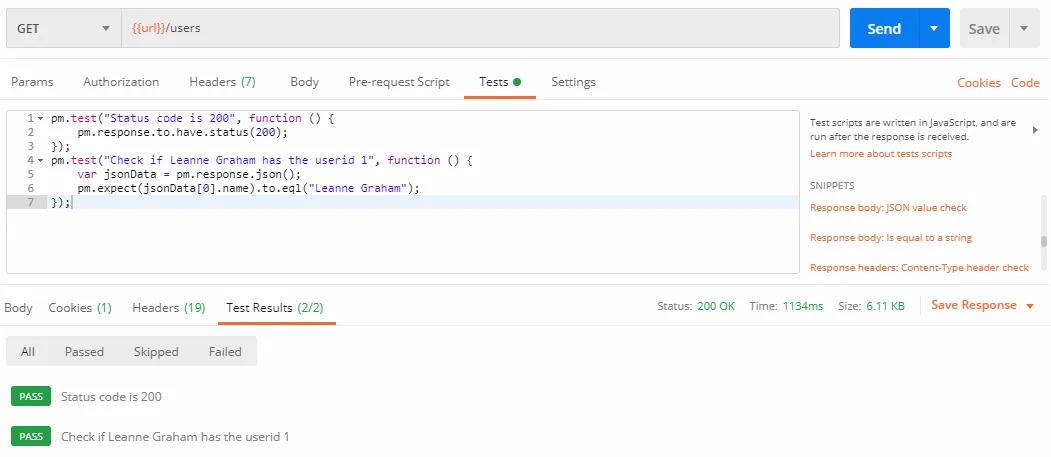
N.B.: Tests fail for three broad reasons — the API's behaviour genuinely changed (a real finding), the test script is wrong (fix the test), or the network hiccuped (rerun, and consider whether your suite needs retry tolerance). Learning to triage a red test quickly is a core professional skill.
The Assertions You Will Use Daily
The snippets are a starting vocabulary; here is the working set, all writable by hand:
// Status and performance
pm.test("Status is 200", () => pm.response.to.have.status(200));
pm.test("Responds within 500 ms", () => {
    pm.expect(pm.response.responseTime).to.be.below(500);
});

// Headers
pm.test("Content-Type is JSON", () => {
    pm.expect(pm.response.headers.get("Content-Type"))
        .to.include("application/json");
});

// Body values and structure
const body = pm.response.json();
pm.test("Returns 10 users", () => pm.expect(body).to.have.lengthOf(10));
pm.test("First user has an email", () => {
    pm.expect(body[0]).to.have.property("email");
    pm.expect(body[0].email).to.be.a("string").and.to.include("@");
});
Best practice: one behaviour per test. A single giant test with twenty assertions stops at the first failure and hides the other nineteen results; twenty small tests give you the full diagnostic picture in one run.
The AI shortcut: you no longer have to write every test by hand — Postbot (Chapter 14) can generate this entire suite from a prompt like "add tests for the status code, response time, and the schema of the response", and can repair a failing script. Learn the manual craft first, exactly as in this chapter: it is what lets you review, trust, and correct what the AI produces.
Variables and Environments
Hard-coded values are the enemy of scale. The moment your suite must run against staging and production, or a hundred requests share one base URL, you need variables — and Postman's variable system, used well, is what makes a collection portable across machines, environments, and CI pipelines.
Create an Environment
An environment is a named set of key–value pairs. The same collection, pointed at different environments, becomes a smoke suite for every stage of your pipeline.
Step 1 — Click on the eye icon.
Step 2 — Click on the Add button and give the environment a name — Staging, say.
Step 3 — Set the VARIABLE as baseUrl and the INITIAL VALUE to your API's base URL — for example https://jsonplaceholder.typicode.com, or your team's staging URL.
N.B.: The CURRENT VALUE is set automatically after you set the initial value.
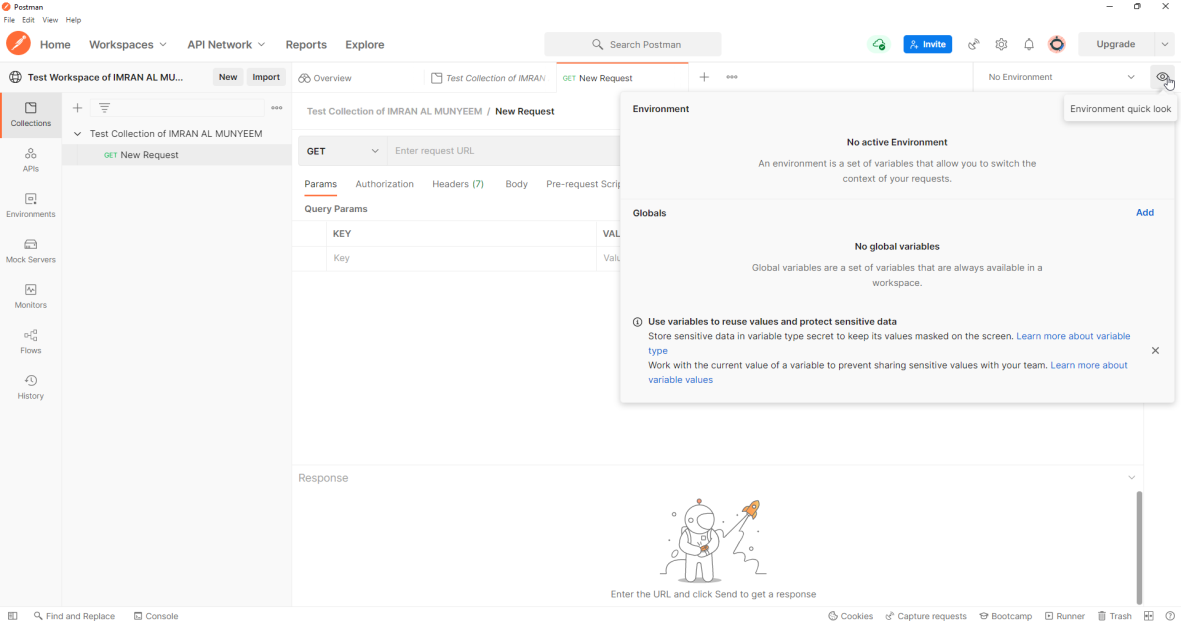
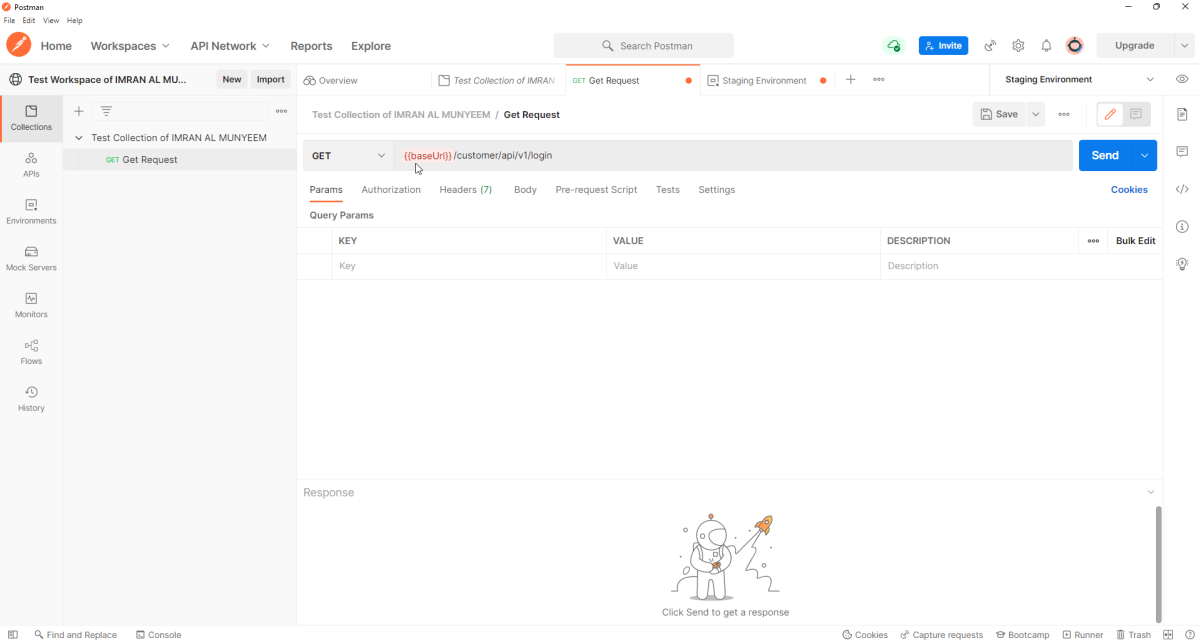
Step 4 — Now go back to the collection and replace the hard-coded base URL with {{baseUrl}}.
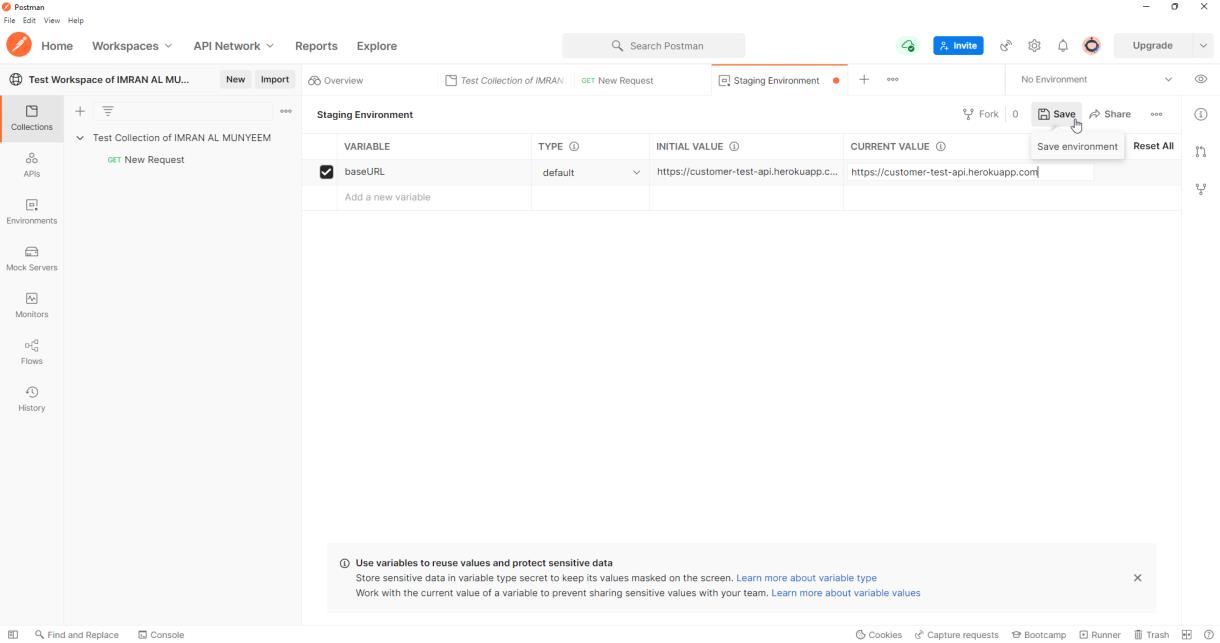
Step 5 — Click the Save button after adding the URL and variables.
Important note: when you use a variable, reference it inside double curly brackets. You will see {{baseUrl}} turn orange when it resolves. If it stays red, either the name is misspelt or no environment is selected.
Step 6 — Select the environment from the environment list.
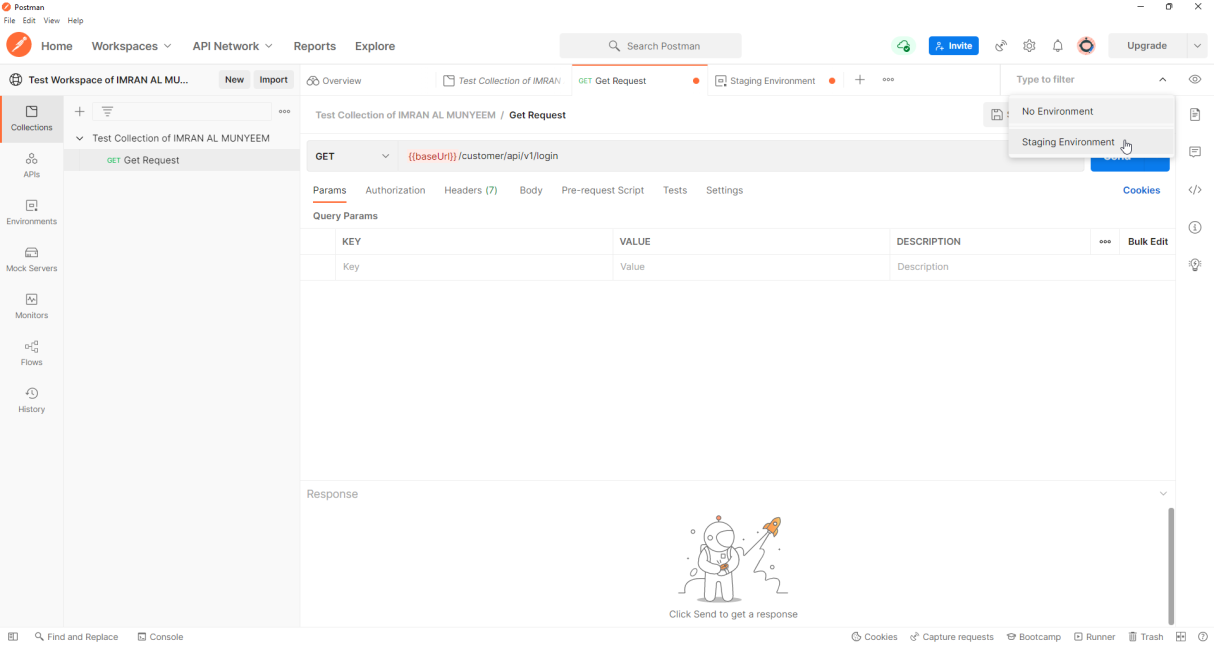
Create a second environment — Production — with the same variable names and different values, and switching your entire suite between environments becomes a one-click act. That symmetry of names is the discipline: environments should differ in values, never in structure.
The Five Variable Scopes
Postman resolves variables through five scopes, narrowest wins:
local > data > environment > collection > global
- Global variables live outside any environment — quick, convenient, and best kept for prototyping.
- Collection variables travel with the collection, making them ideal for constants that belong to the suite itself (API version strings, fixed test record IDs) — they work even when someone imports your collection without your environments.
- Environment variables are the workhorses: everything that differs between staging and production.
- Data variables come from a CSV/JSON file during data-driven runs (Chapter 10).
- Local variables exist only for a single request or iteration — set them in scripts to override everything temporarily; they vanish when the run ends.
In scripts, each scope has an API: pm.environment.get("baseUrl"), pm.collectionVariables.set("userId", id), pm.globals.get(...), and the scope-walking pm.variables.get(...) which respects the precedence order.
Secrets: the Part Everyone Gets Wrong Once
Two facts about Postman variables have security consequences:
- Initial values sync to Postman's servers and are shared with anyone who can see the workspace. Current values stay local to your machine.
- Exported environment files contain values in plain text.
Therefore: real credentials go in current values only; set their variable type to secret so they are masked on screen; and for the most sensitive material, use Postman Vault, which keeps values encrypted locally and entirely out of cloud sync. In CI, don't ship credentials in files at all — inject them from the pipeline's secret store (Chapter 13 shows how).
Pitfall: the classic leak is a Bearer token pasted into an initial value "just for a second," then synced, then forked into a public workspace. Decide your secret-handling rules on day one, before there is anything to leak.
Advanced Scripting
One request that checks itself is a test; several requests that cooperate are a workflow. This chapter adds the scripting techniques that turn a pile of requests into realistic end-to-end scenarios: pre-request scripts, passing data between requests, dynamic test data, schema validation, and shared logic at folder and collection level.
Pre-request Scripts
Everything in Scripts → Pre-request runs before the request is sent — the natural home for setup: computing a timestamp, generating a signature, fetching a fresh token, or logging state for debugging.
// Give every run a unique correlation id
pm.environment.set("runId", pm.variables.replaceIn("{{$guid}}"));

// Log what we're about to do (appears in the Postman Console)
console.log("Creating user with runId", pm.environment.get("runId"));
The Postman Console (footer, or View → Show Postman Console) is your debugger: it shows every request as actually sent — resolved variables, final headers — plus everything you console.log. When a variable "mysteriously" doesn't resolve, the Console ends the mystery in seconds.
Chaining Requests: the Create-then-Verify Pattern
Real scenarios span requests: create a resource, capture its ID, then read, update, and delete it. The bridge is a variable set in one request's post-response script and used in the next request's URL.
In the POST /users post-response script:
pm.test("User created", () => pm.response.to.have.status(201));

const created = pm.response.json();
pm.collectionVariables.set("newUserId", created.id);
The next request's URL becomes {{baseUrl}}/users/{{newUserId}}, with its own tests:
pm.test("Created user is retrievable", () => {
    pm.response.to.have.status(200);
    pm.expect(pm.response.json().id)
        .to.eql(pm.collectionVariables.get("newUserId"));
});
Run the collection (Chapter 10) and the whole life cycle executes in order — a genuine integration test.
Controlling the flow: by default the runner executes requests top to bottom. Scripts can redirect it:
// Jump to a named request
pm.execution.setNextRequest("Delete user");

// Or stop the run entirely
pm.execution.setNextRequest(null);
(The older postman.setNextRequest(...) still works; pm.execution.setNextRequest is the current API.) Use flow control sparingly — a suite that jumps around is hard to read — but it is invaluable for skip-on-failure logic and polling loops.
Dynamic Test Data
Postman bundles the Faker library as dynamic variables, resolvable anywhere with {{$...}}:
{{$guid}}— a unique identifier{{$timestamp}}— current Unix time{{$randomEmail}},{{$randomFullName}},{{$randomInt}}— realistic random data
A POST body like {"email": "{{$randomEmail}}"} gives every run fresh, collision-free data — which is what lets the same suite run repeatedly against a persistent staging database without tripping over its own leftovers.
Best practice: tests that create data should delete it. A teardown request at the end of a workflow folder keeps staging clean and keeps your suite re-runnable — the cardinal virtue of automation.
Schema Validation: Contract Testing in Ten Lines
Field-by-field assertions catch value bugs; schema validation catches structural drift — a renamed field, a number that became a string, a missing property — which is exactly what breaks API consumers. Postman ships the ajv JSON-schema validator via Chai's jsonSchema matcher:
const userSchema = {
    type: "object",
    required: ["id", "name", "email"],
    properties: {
        id:    { type: "integer" },
        name:  { type: "string" },
        email: { type: "string", pattern: "@" }
    }
};

pm.test("Response matches the user schema", () => {
    pm.expect(pm.response.json()[0]).to.be.jsonSchema(userSchema);
});
Store shared schemas in a collection variable (as a JSON string) and JSON.parse them in tests, and every endpoint returning a user validates against the same contract.
Sharing Logic: Collection and Folder Scripts
Scripts don't only belong to requests. A collection-level post-response script runs after every request in the collection — the perfect home for universal assertions:
pm.test("No server errors", () => {
    pm.expect(pm.response.code).to.be.below(500);
});
Folder-level scripts do the same for a folder's requests. Execution order is collection → folder → request for pre-request scripts, and the same order again for post-response scripts. Shared assertions written once at the top level are the single cheapest coverage upgrade available in Postman.
Your toolbox is now complete. The remaining question — the most important one — is what to point it at.
Designing a Test Strategy
Tools execute tests; testers choose them. Given an endpoint, what should you actually verify? This chapter is the checklist and the reasoning behind it — the difference between a suite that looks busy and a suite that catches bugs.
The Layered Checklist
For every endpoint that matters, work outside-in through five layers:
1. Protocol layer. The right status code for the right situation — 200/201/204 on success, and specific failures: 400 for malformed input, 401 for missing credentials, 403 for insufficient rights, 404 for absent resources. The correct Content-Type. Sensible response time.
2. Contract layer. The response matches its schema: required fields present, types correct, formats valid (dates parse, emails contain @, IDs are the declared type). This is Chapter 7's schema validation, applied everywhere consumers depend on structure.
3. Data layer. The values are right: the created user has the name you sent; the filtered list contains only matching records; the total equals the sum of the parts; pagination returns page 2, not page 1 again.
4. Behaviour layer. State actually changed: after DELETE, a GET returns 404; after PATCH, only the patched fields differ; POSTing the same order twice does not charge twice. These require chained requests — and they are where the most expensive bugs live.
5. Security layer. Every negative auth case from Chapter 4: no token, expired token, wrong user's token, insufficient role. Plus: error responses that don't leak stack traces or internal hostnames.
Positive, Negative, and Boundary
For each input an endpoint accepts, generate cases along three axes:
- Positive — valid, typical input succeeds (the case everyone writes).
- Negative — invalid input fails correctly: missing required fields, wrong types, malformed JSON, unknown IDs, illegal state transitions. The assertion is not merely "it fails" but "it fails with the right status and a useful error body." APIs that return 500 for bad input have a bug even though they rejected the request.
- Boundary — the edges: empty strings, zero, negative numbers, maximum lengths, page sizes of 0 and 1 and the documented limit and the limit plus one, Unicode in text fields.
A practical heuristic: for a typical endpoint, expect one or two positive cases and five to ten negative and boundary cases. If your suite is mostly green-path, it is mostly decorative.
Prioritising: You Cannot Test Everything First
Order the work by risk: start with the endpoints whose failure costs most (auth, payment, anything that writes data), then the ones that change most often, then the rest. A ten-test suite on the login endpoint beats a hundred tests on a static reference lookup.
Best practice — the regression contract: every bug found in production earns a permanent test reproducing it. Over a year, this single habit builds the most valuable suite you will own, because it is provably aligned with real failure modes.
Keeping the Suite Honest
Three disciplines keep a growing suite trustworthy:
- Deterministic tests. A test that sometimes fails without a code change is worse than no test — it trains the team to ignore red. Hunt flakiness down: usually shared state, missing teardown, or time-dependent assertions.
- Independent tests where possible. Chained workflows are necessary, but keep chains short and self-contained within a folder; a suite where request 40 depends on request 3 is unmaintainable.
- Readable failures. Name tests so a red line states the defect: "PATCH ignores read-only fields" tells the developer everything before they open Postman.
With a strategy in hand and a suite taking shape, the next problems are human and operational: sharing the work with a team, and running it at scale.
Part IV — Collaboration and Scale
A test suite that lives on one laptop is a liability. This part moves your work into circulation: sharing and versioning collections and environments, running whole suites with the Collection Runner — including data-driven and scheduled runs — and standing up mock servers and monitors so your suite serves the team around the clock.
Sharing Your Work: Export and Import
The exported JSON file you will meet in this chapter is more than a sharing convenience — it is exactly what the command-line runners in Chapter 12 consume, which makes exporting the bridge between Postman-the-app and Postman-in-your-pipeline.
Share a Collection from Postman
Step 1 — Click on the […] button beside your collection.
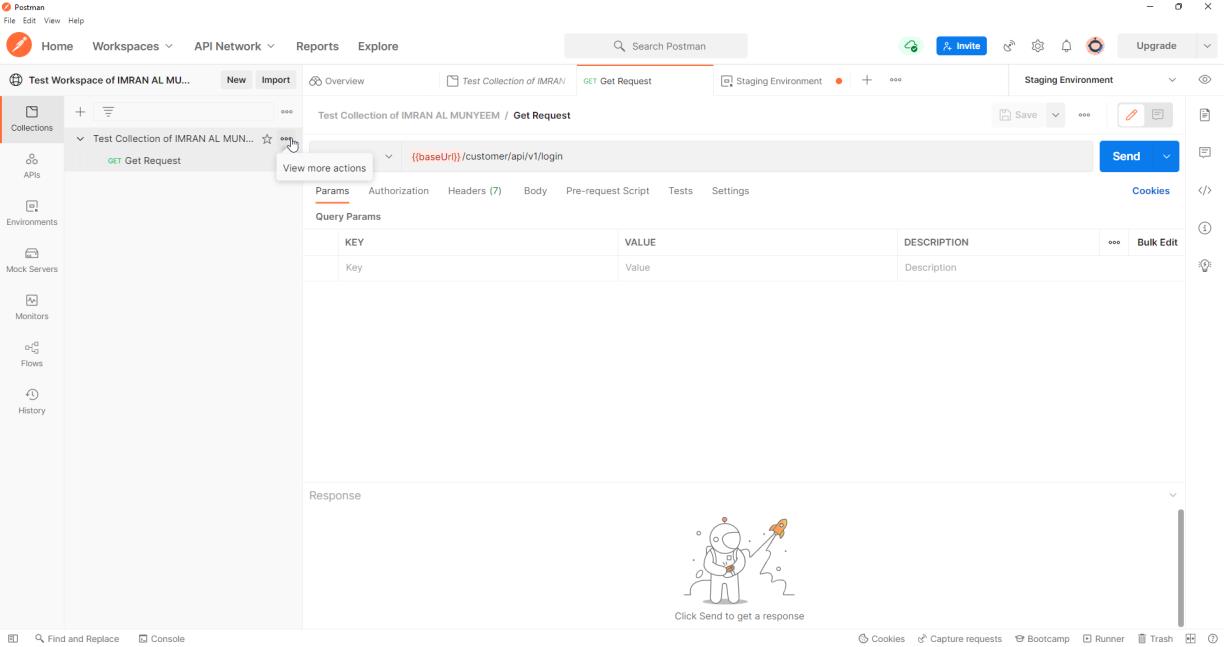
Step 2 — Click on Share collection.
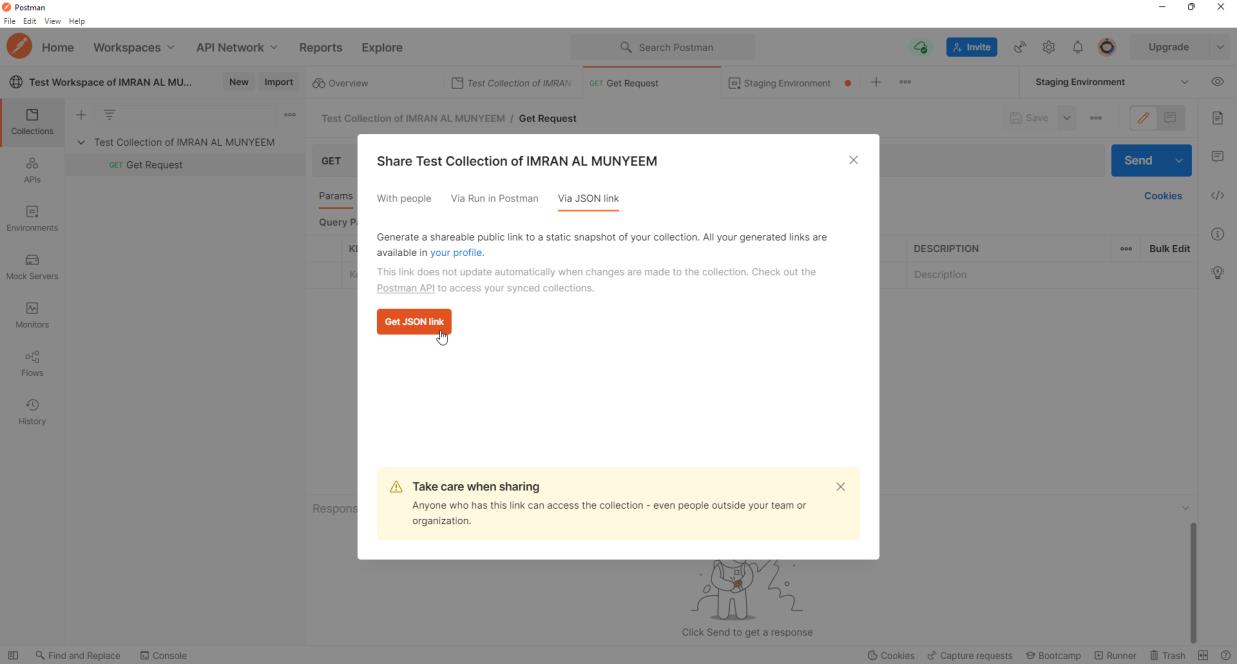
Step 3 — Choose how to share it — with specific people, via Run in Postman, or via a JSON link.
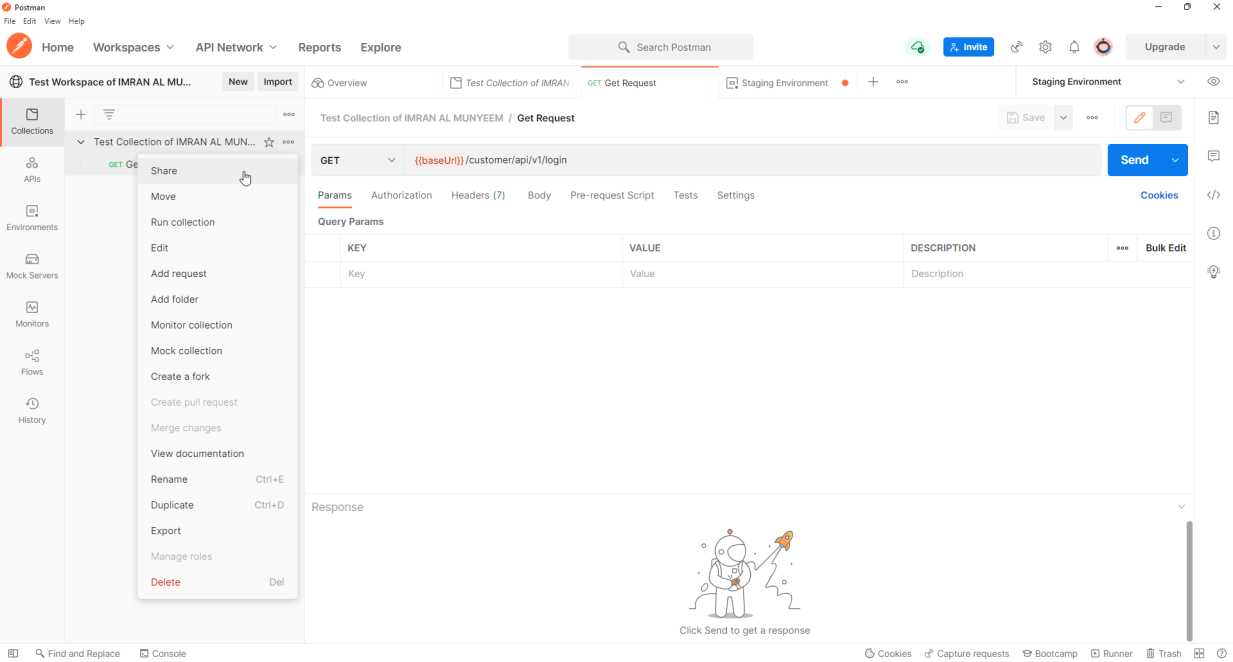
Step 4 — Anyone with access can import or fork the collection.
Best practice: with teammates, skip links entirely — move the collection into a shared team workspace. Everyone then works on the live collection with version history, forking, and pull-request-style merges, instead of emailing snapshots that immediately go stale. A JSON link is a static snapshot, and anyone holding it can read the collection — never link a collection containing credentials.
Export a Collection as a File
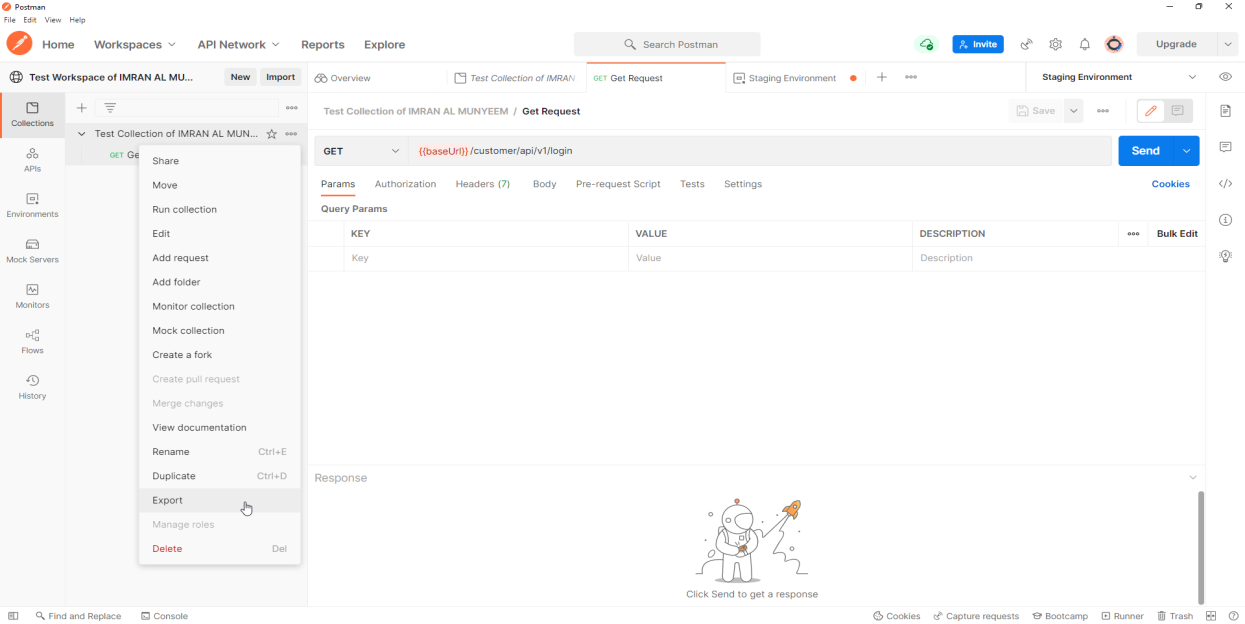
Step 1 — Click on the […] button beside your collection, as before.
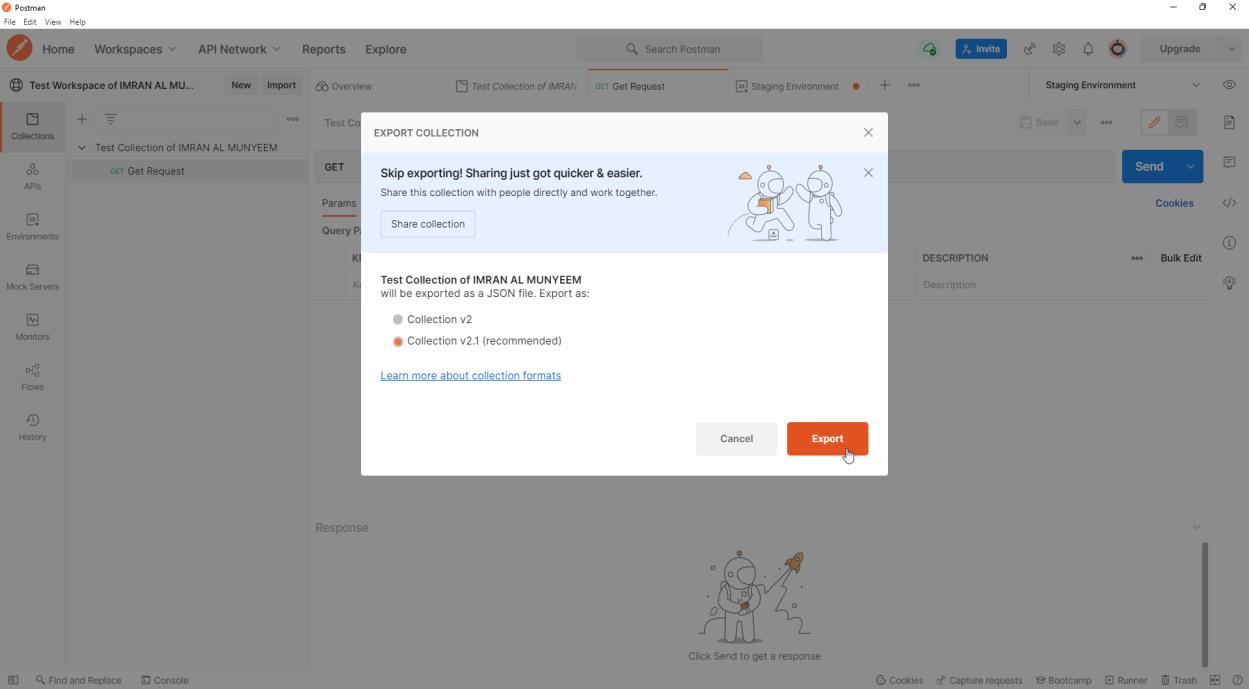
Step 2 — Click on the Export button, choose Collection v2.1 (recommended), and save the file to your local disk.
A modern note: Postman v12 introduced a newer collection v3 (YAML) format used by its Native Git workflows. Newman, the classic command-line runner, does not support v3 — only the Postman CLI does. For maximum compatibility with existing tooling, v2.1 JSON remains the safe default export today.
Best practice — version the suite: commit the exported collection (and sanitised environments) to the same Git repository as the code it tests, under a collections/ folder. Tests then ride through code review, branch with features, and are available to every CI agent — the pattern Chapter 13 builds on.
Export an Environment
In the same way, export the environment and save it alongside the collection.
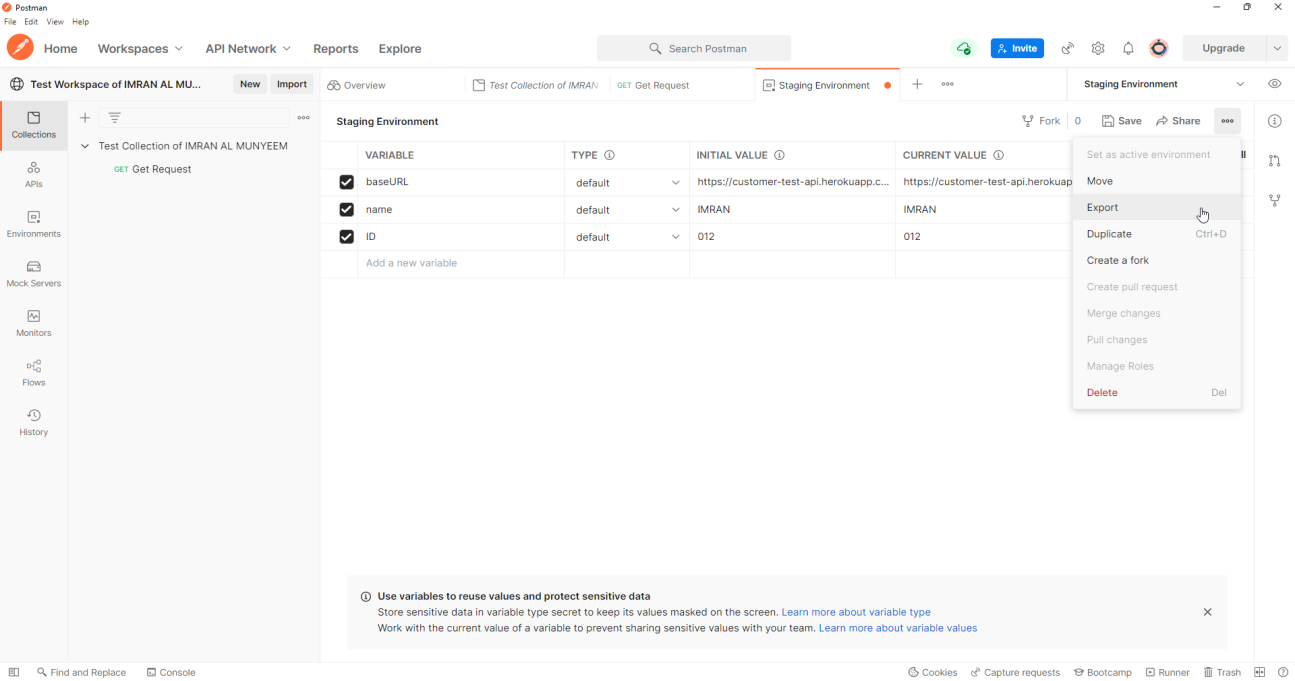
Security note: an exported environment file contains its variable values in plain text. Before committing one to Git, strip tokens and passwords — or keep secrets in current values only (which are never exported) and inject real credentials in CI from the pipeline's secret store.
Import a Collection
Step 1 — Go to the Collections tab.
Step 2 — Click on the Import button.
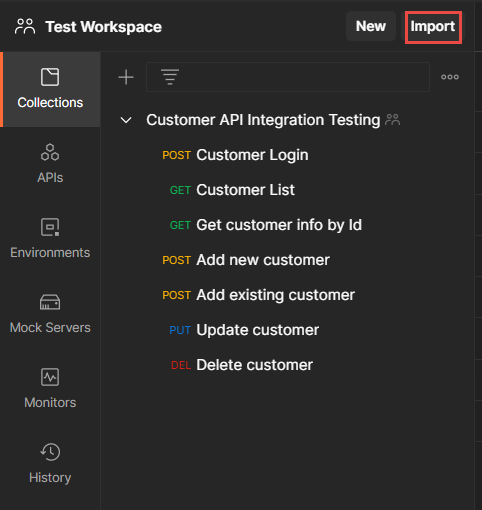
You can import from files, folders, links, or raw text — and not only Postman's own format: Postman imports OpenAPI/Swagger definitions (generating a full collection from the spec, a superb starting point for contract tests) and cURL commands copied from browser dev tools or documentation.
Import an Environment
Step 1 — Go to the Environments tab.
Step 2 — Click on the Import button.
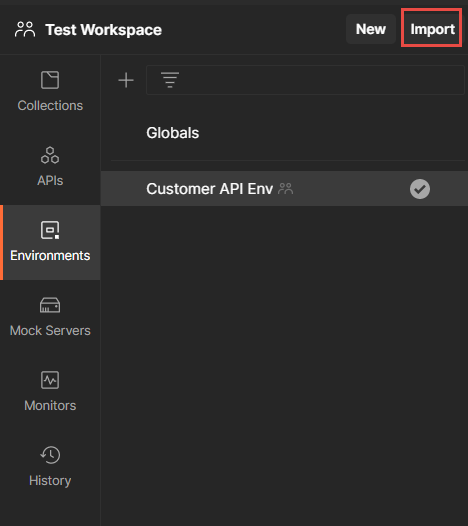
Step 3 — Locate the environment file you exported earlier. The importer can now run every request in the collection.
Running Collections at Scale
Sending requests one by one is exploration. The Collection Runner executes the whole suite — every request, every test, in order — and is the same engine your CI pipeline will drive in Part V.
Run from the Run Tab
Step 1 — Select your collection and click the Run button.
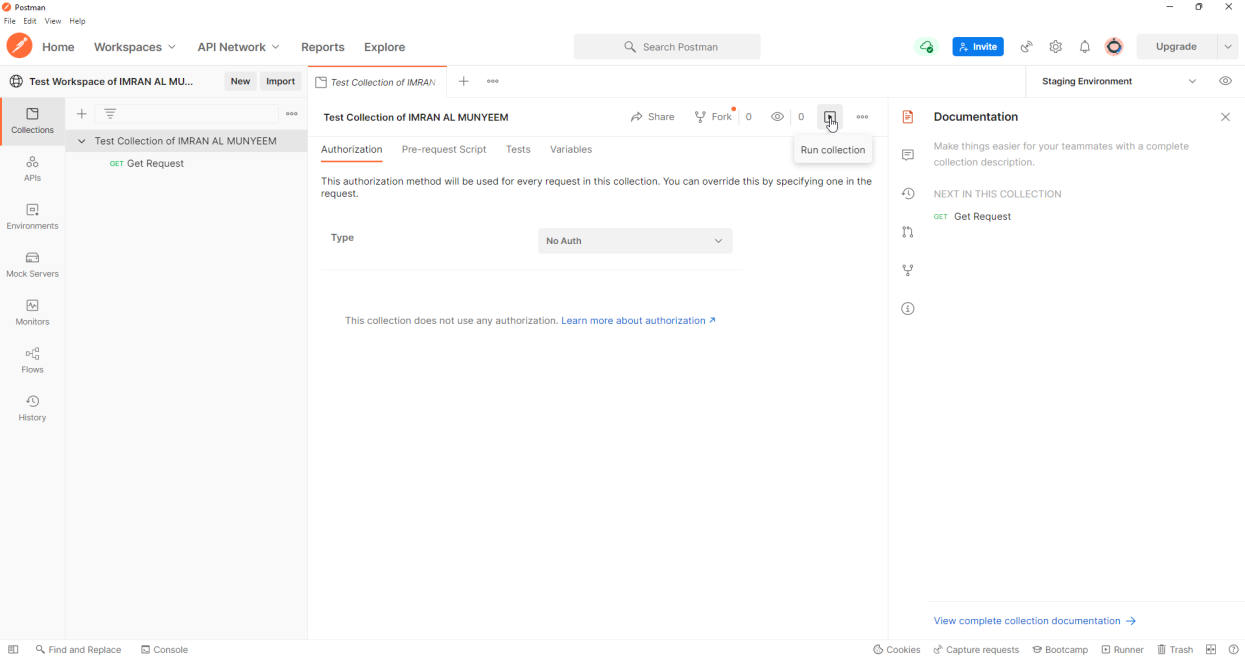
Step 2 — Iterations defaults to 1, meaning the whole suite runs once. Click run, and watch the results stream in: each request with its status, time, size, and every test's pass/fail.
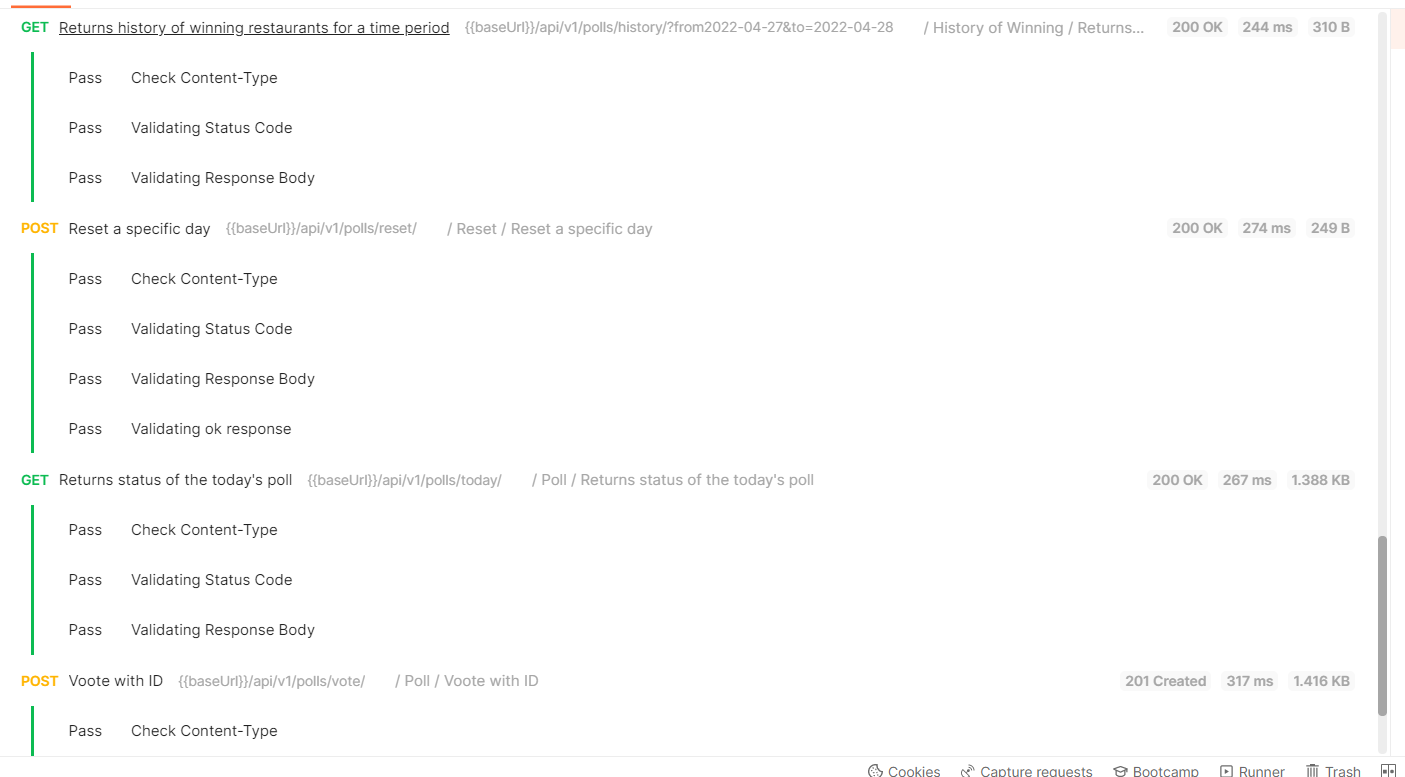
Run from the Actions Menu
Step 1 — Click on Run from the […] menu.
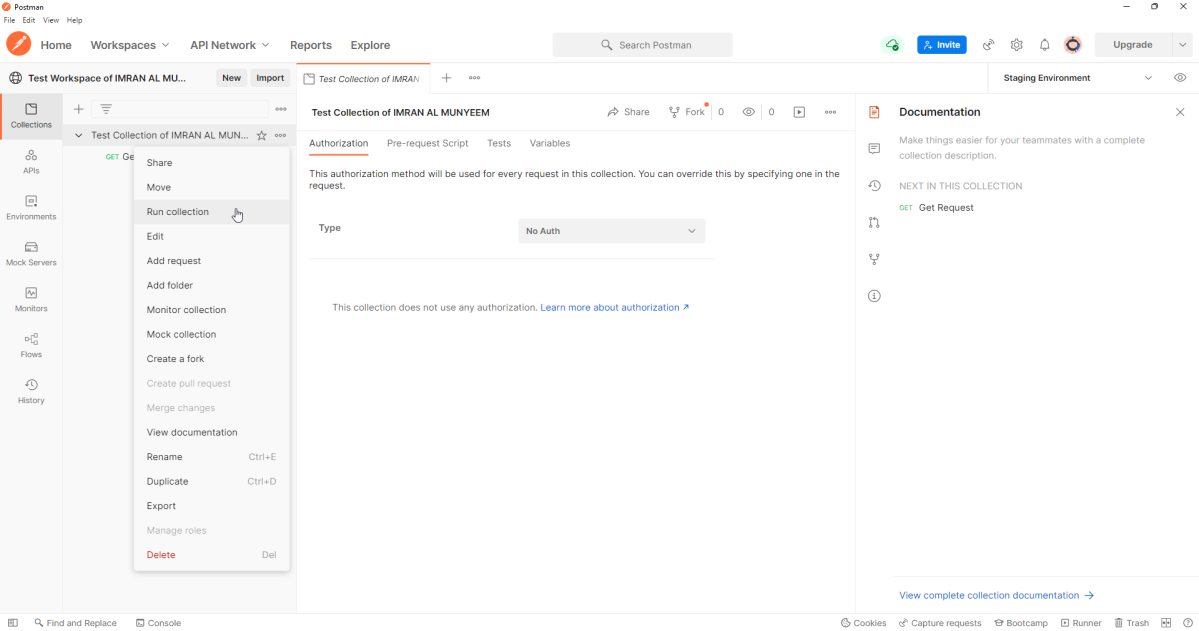
Step 2 — Configure the run — environment, iterations, delay, data file — then start it.
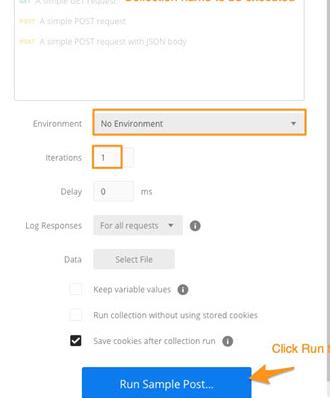
The options that matter:
- Environment — which set of variables to run against; this is where the staging/production switch pays off.
- Iterations — run the suite N times; combined with random data (Chapter 7), a quick stability check.
- Delay — milliseconds between requests, a courtesy to rate-limited APIs.
- Data file — the gateway to data-driven testing, next.
Data-Driven Testing
Supply a CSV or JSON file and the runner executes one iteration per row, resolving {{columnName}} variables from the file. A login endpoint tested against a spreadsheet of credential cases is the classic example:
email,password,expectedStatus
valid@example.com,correct-pass,200
valid@example.com,wrong-pass,401
,correct-pass,400
not-an-email,correct-pass,400
The request body uses {{email}} and {{password}}, and the test reads the expectation from the same row:
pm.test("Status matches the data file", () => {
    pm.response.to.have.status(
        Number(pm.iterationData.get("expectedStatus"))
    );
});
One request, one test, dozens of cases — and adding a case is now a spreadsheet edit, which means non-programmers on the team can extend coverage. This is Chapter 8's negative-and-boundary strategy industrialised.
Scheduled Runs and Performance Tests
From the runner screen you can also schedule the collection to run on Postman's cloud at a chosen frequency — a zero-infrastructure nightly regression, with results waiting in the workspace each morning. And on paid plans, the same screen offers performance testing: simulated virtual users driving your collection in parallel, with latency and error-rate graphs. Performance runs answer the question functional tests cannot: does the API stay correct under load? Watch for the tell-tale professional finding — response times that hold steady while error rates climb, or vice versa.
Mock Servers and Monitors
Two Postman features extend your collection beyond testing: mocks let work start before the API exists, and monitors keep watch after it ships. Both are built from assets you already have.
Mock Servers: Test Before the API Exists
A mock server serves the examples saved on your requests (Chapter 3) from a real URL that Postman hosts. Create one from the workspace sidebar (New → Mock Server), attach it to your collection, and Postman gives you a URL; any request to it returns the matching saved example.
Why testers care:
- Unblock front-end work — the UI team codes against realistic responses weeks before the backend lands.
- Test your own tests — point the suite at a mock that returns known-good and known-bad examples and verify your assertions catch what they should.
- Simulate the awkward cases — save examples for 500s, timeouts, and malformed bodies that are hard to trigger on demand against a real service.
Treat the mock as part of the contract: when the real API's schema changes, update the examples the same day, or the mock becomes a source of false confidence.
Monitors: Your Suite on Patrol
A monitor runs a collection on a schedule from Postman's cloud and alerts you (by email, or into Slack and similar via integrations) when tests fail — effectively your regression suite converted into a production health check. Create one from New → Monitor, pick the collection, an environment, and a frequency.
Monitors use the environment you attach to them — they do not see your local session state — so double-check that every variable the collection needs has a synced value the monitor can read (which is also a reason monitor environments must never rely on secrets stored only in current values; use a dedicated, least-privilege monitoring credential instead).
Best practice: monitor a small, fast, read-only subset of your suite — a health-check folder — rather than the full regression pack. You want a pager signal, not a nightly data-modifying crawl over production.
Part V — Automation and CI/CD
Everything so far runs when a human clicks. Professional test suites run when code changes — automatically, on every push, with a red build stopping a bad release before customers meet it. This part takes your collection to the command line and then into continuous integration.
The Command Line: Newman and the Postman CLI
Running collections from a terminal is what turns your Postman tests into automation. Today there are two command-line runners, and a professional knows both:
- Newman — the classic, open-source runner, installed via npm. It has years of tutorials behind it and a rich ecosystem of community reporters — most notably htmlextra, whose HTML reports remain the best stakeholder-friendly output in the ecosystem. Note that Newman supports the collection v2/v2.1 JSON format only; it cannot run the newer v3 YAML collections introduced with Postman v12.
- Postman CLI — the official, Postman-built successor, introduced with Postman v10 and actively developed since. It authenticates with a Postman API key, can run collections straight from your workspace without exporting anything, sends results back to Postman's cloud as a shareable run report, and adds API linting/governance on enterprise plans.
For a brand-new pipeline the Postman CLI is the natural starting point; Newman remains fully supported and is everywhere in existing CI systems. Both exit with code 0 on success and non-zero when any test fails — the exact signal CI systems use to pass or fail a build.
Option A — Newman with an HTML Report
Step 1 — Check whether Node.js and npm are installed. Open a terminal and run node -v and npm -v.
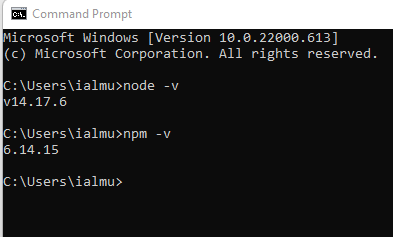
Step 2 — If not, install the current LTS version of Node.js from https://nodejs.org/ — npm ships with it.
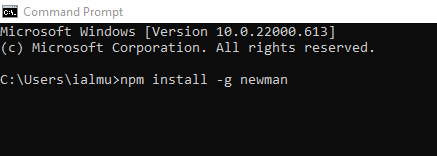
Step 3 — Install Newman globally:
npm install -g newman
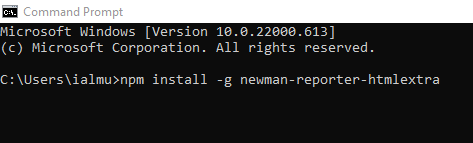
Step 4 — Install the htmlextra reporter:
npm install -g newman-reporter-htmlextra
Step 5 — Run the collection with an environment, producing both console output and an HTML report:
newman run "MyCollection.postman_collection.json" -e "Staging.postman_environment.json" -r cli,htmlextra

Step 6 — A folder named newman is created automatically, containing the report — open it in a browser for a full dashboard of requests, tests, and failures.
Step 7 — The switches you will actually use: -d data.csv for data-driven runs, -n 10 for iteration counts, --folder "Smoke" to run a single folder, --env-var "token=$TOKEN" to inject a secret from the shell without any file. Full reference: https://www.npmjs.com/package/newman.
Option B — the Postman CLI
Step 1 — Install the Postman CLI with the one-line installer for your OS from https://learning.postman.com/docs/postman-cli/postman-cli-installation/.
Step 2 — Generate a Postman API key from your profile settings and log in:
postman login --with-api-key YOUR_API_KEY
Step 3 — Run a collection — from a local export, exactly like Newman:
postman collection run "MyCollection.postman_collection.json" -e "Staging.postman_environment.json"
…or directly from your workspace by ID, no export step at all:
postman collection run 12345678-abcd-efgh-ijkl-9876543210ab
Step 4 — At the end of the run, the CLI prints a link to a full run report in your workspace — pass/fail per test, response times, console output — shareable with anyone on the team.
Choosing between them: exported-file workflows and rich local HTML reports favour Newman; workspace-live collections, cloud reporting, and governance favour the Postman CLI. Many teams run both during a transition, since the command shapes are nearly identical.
Continuous Integration: Jenkins and GitHub Actions
Continuous integration is where API tests earn their keep: every push, every merge, every night — the whole collection runs, and the build goes red the moment an API breaks. This chapter sets up Jenkins, the long-standing workhorse of CI, then shows the modern cloud-native equivalent in GitHub Actions. The principle is identical everywhere: install a runner, execute the collection, respect the exit code.
Set Up Jenkins
Step 1 — Install a supported Java runtime and set its environment variable. Modern Jenkins requires Java 21 (recent LTS lines dropped Java 17 and older — the Java 8 instructions in old tutorials will not work). The easiest source is Eclipse Temurin: https://adoptium.net/. Verify with:
java -version
Step 2 — Download the Jenkins WAR file (or a native installer) from https://www.jenkins.io/download/.
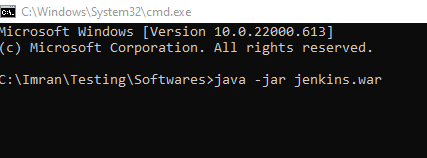
Step 3 — Go to the Jenkins file's location, open a terminal, and run:
java -jar jenkins.war
This starts the Jenkins server on local port 8080. (N.B.: don't close the terminal. On a real build server, install Jenkins as a service instead.)
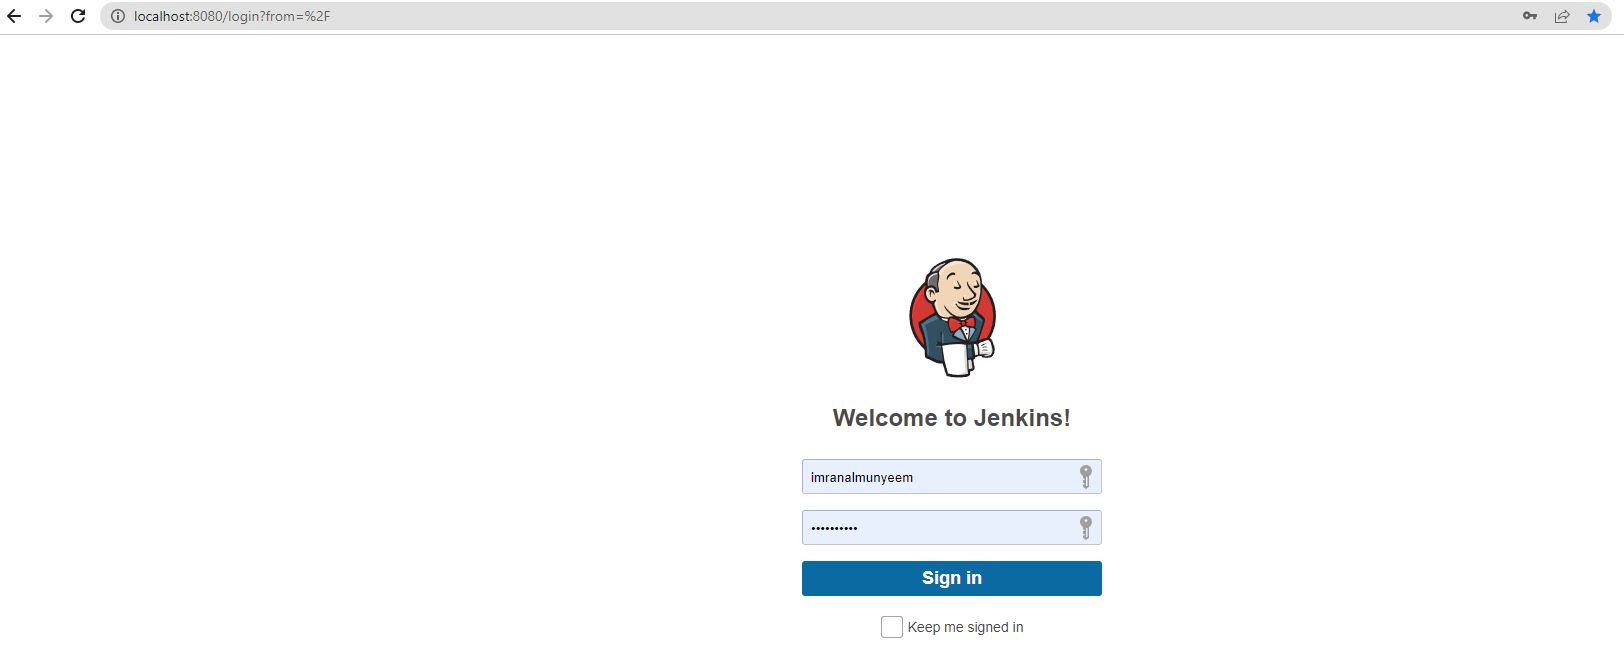
Step 4 — Open Jenkins in your browser at http://localhost:8080/.
Step 5 — Complete the setup wizard and log in.
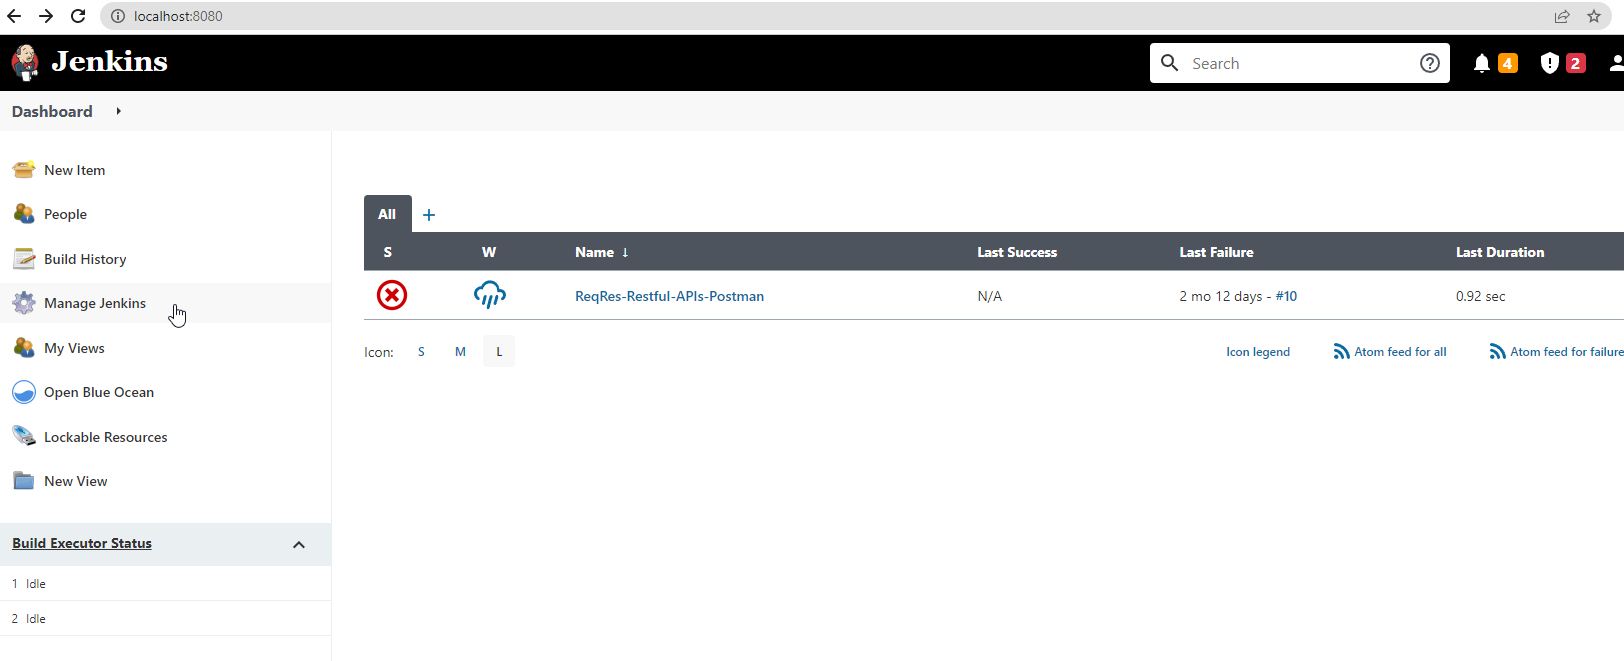
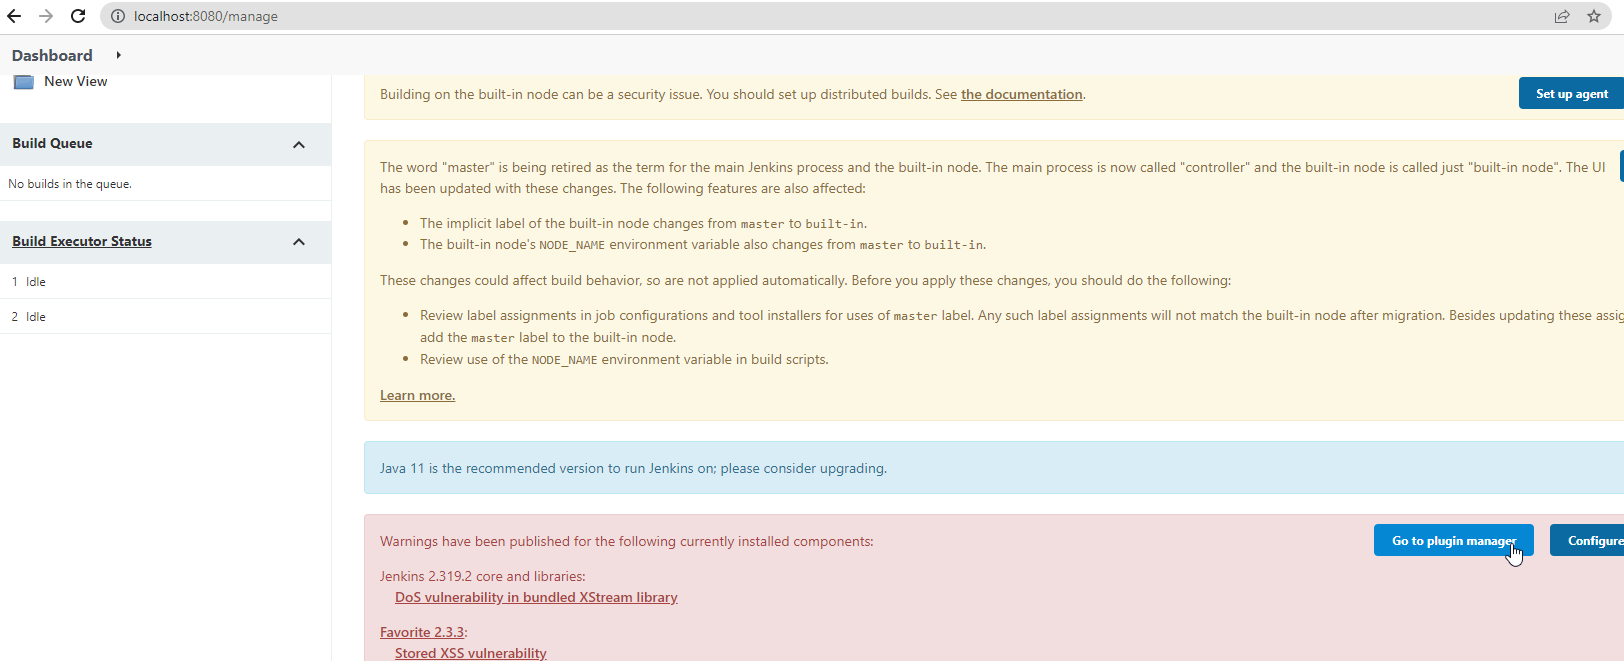
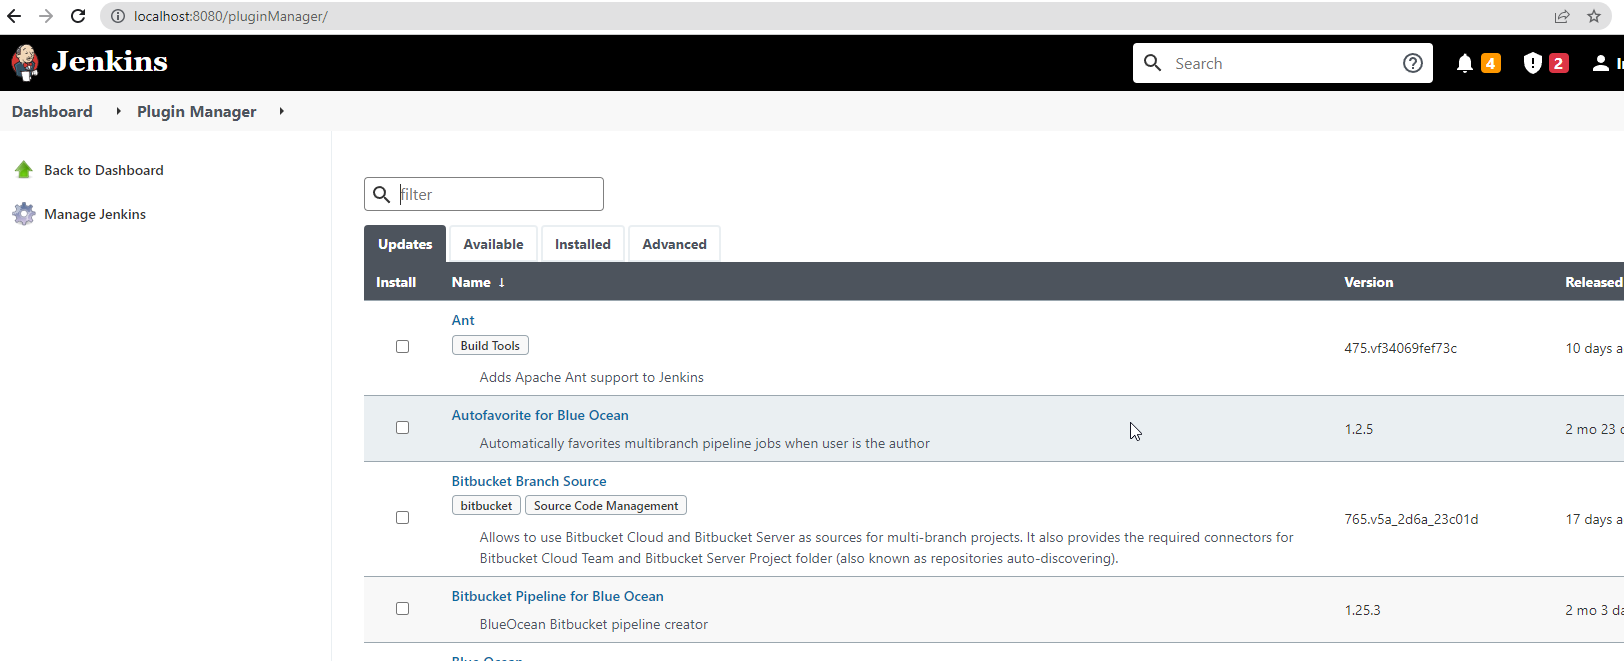
Step 6 — Click on Manage Jenkins, open Plugins, and install the recommended plugins. While you are there, also install the NodeJS plugin — it lets Jenkins provision Node.js and install Newman on the build agent automatically, far more reliable than depending on whatever happens to be installed on the machine.
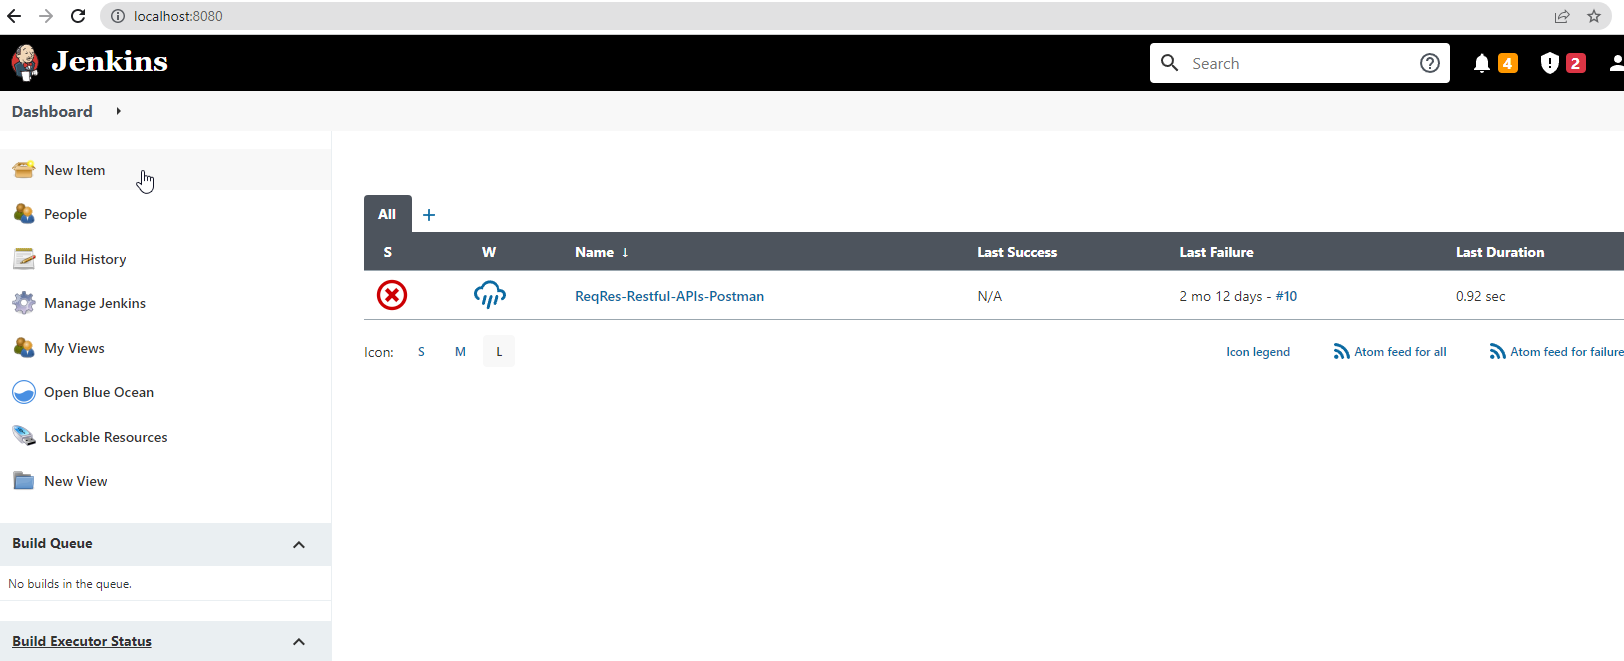
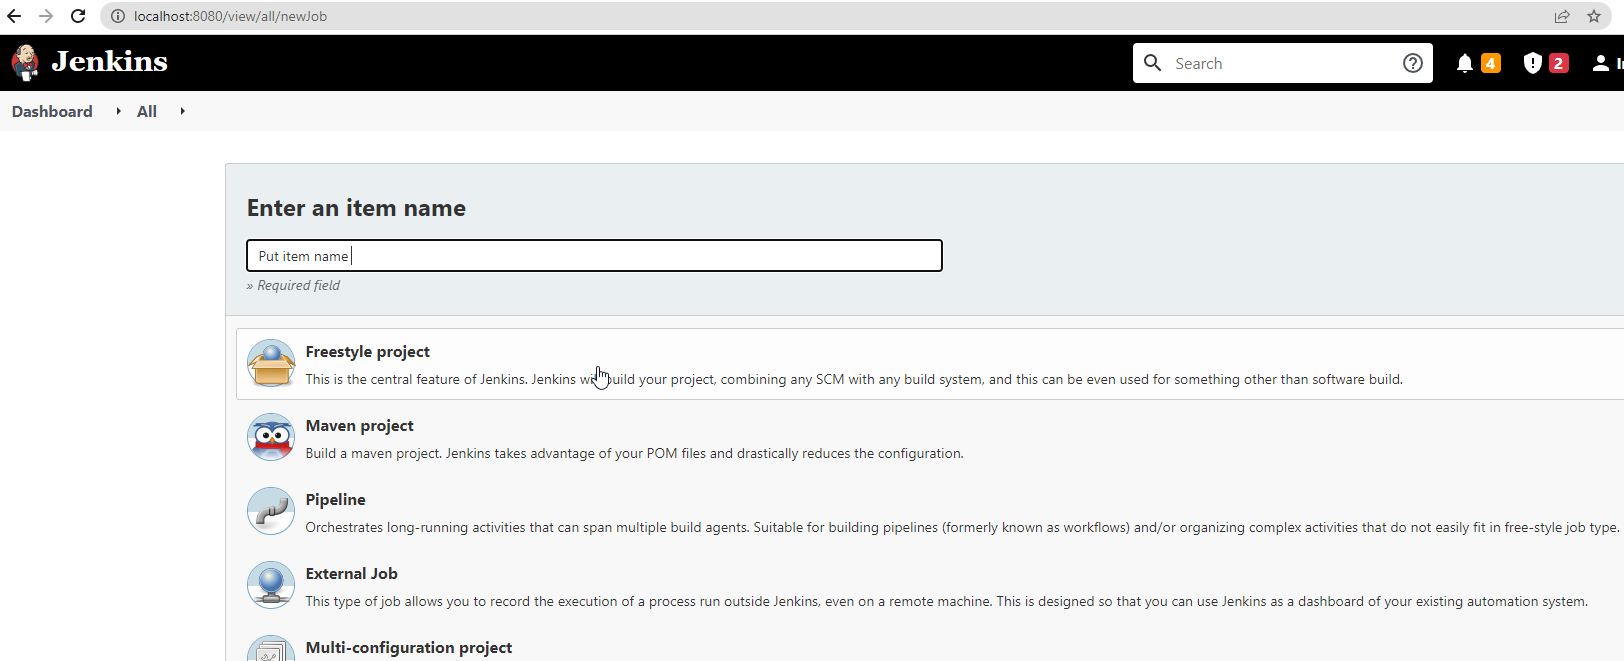
Step 7 — Click on New Item, enter a project name, select Freestyle project (the simplest to learn with), and save.
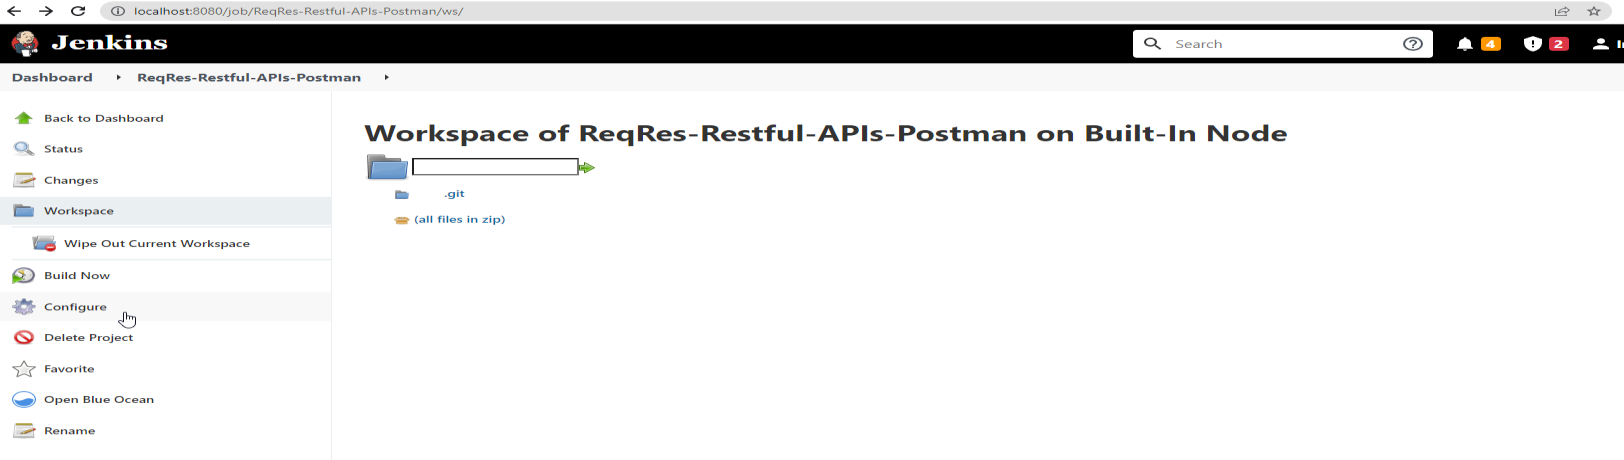
Step 8 — Open the project and click Configure.
Run from a Local Path
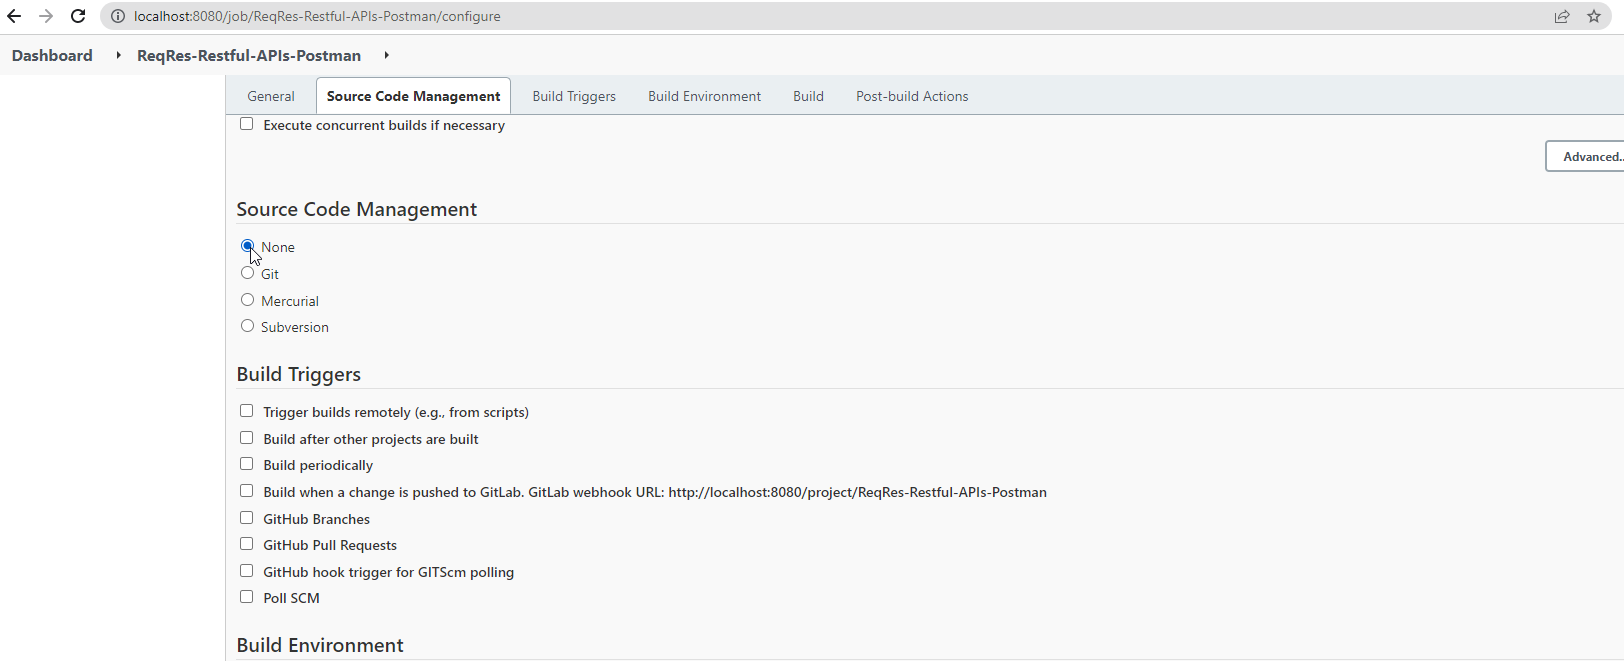
→ Set Source Code Management to None.
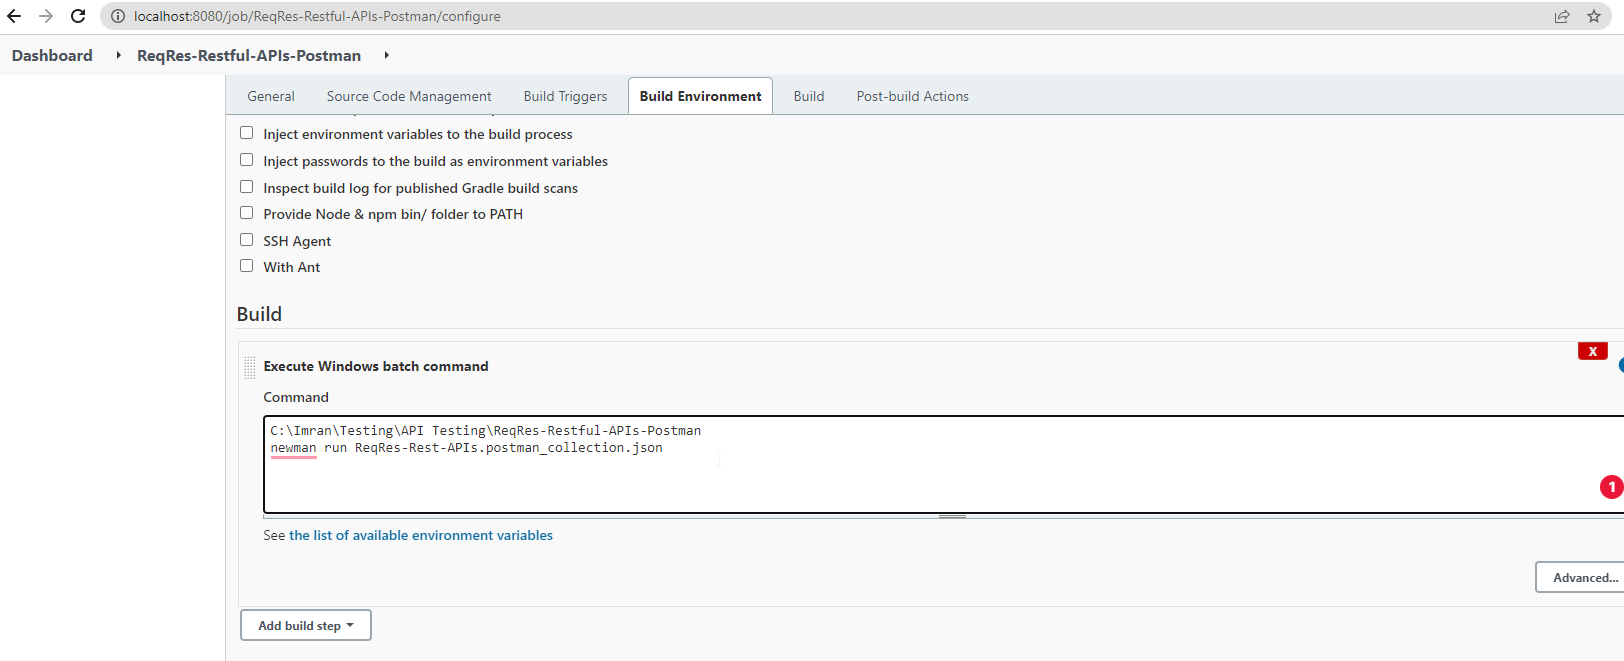
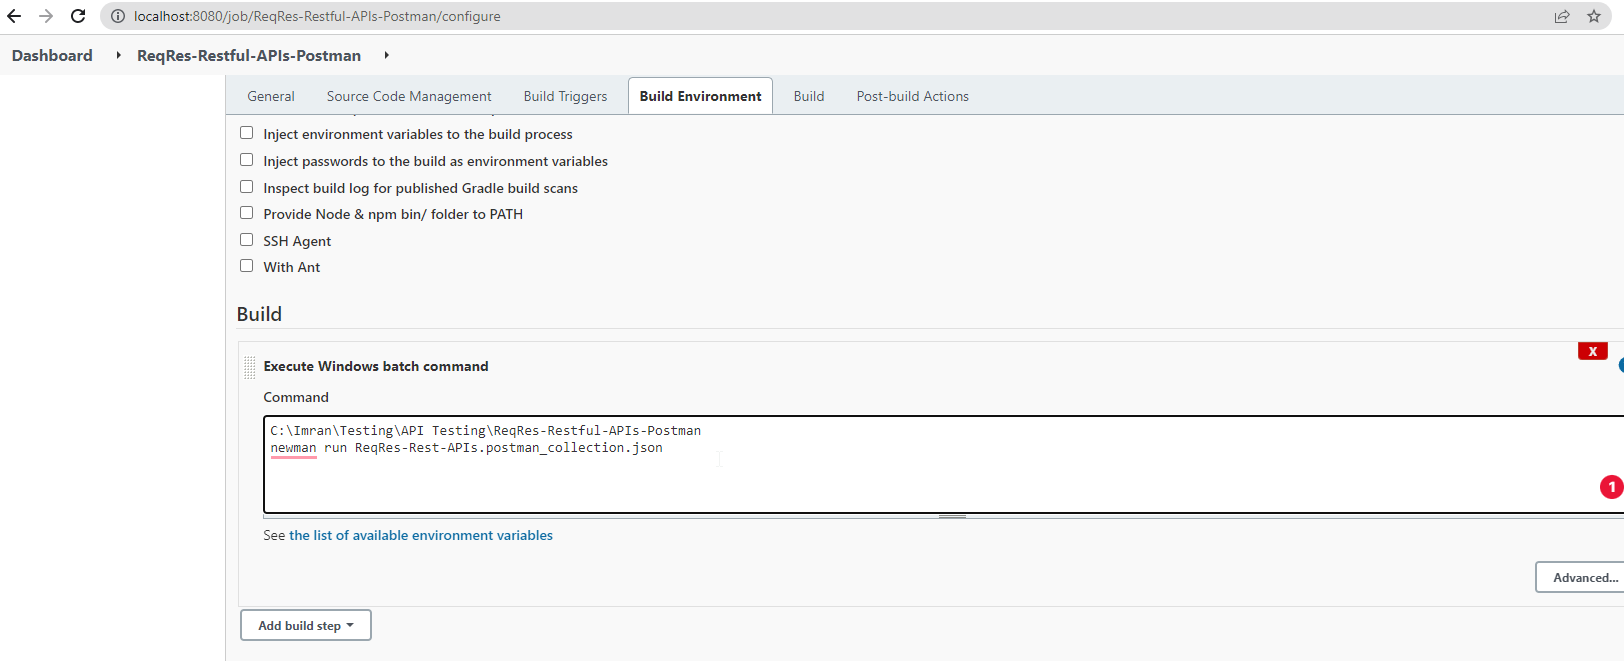
→ Add a build step — Execute Windows batch command on a Windows agent, or Execute shell on Linux/macOS — with the Newman command and the collection's path, then save:
newman run "C:\Projects\API-Tests\MyCollection.postman_collection.json" -r cli,htmlextra
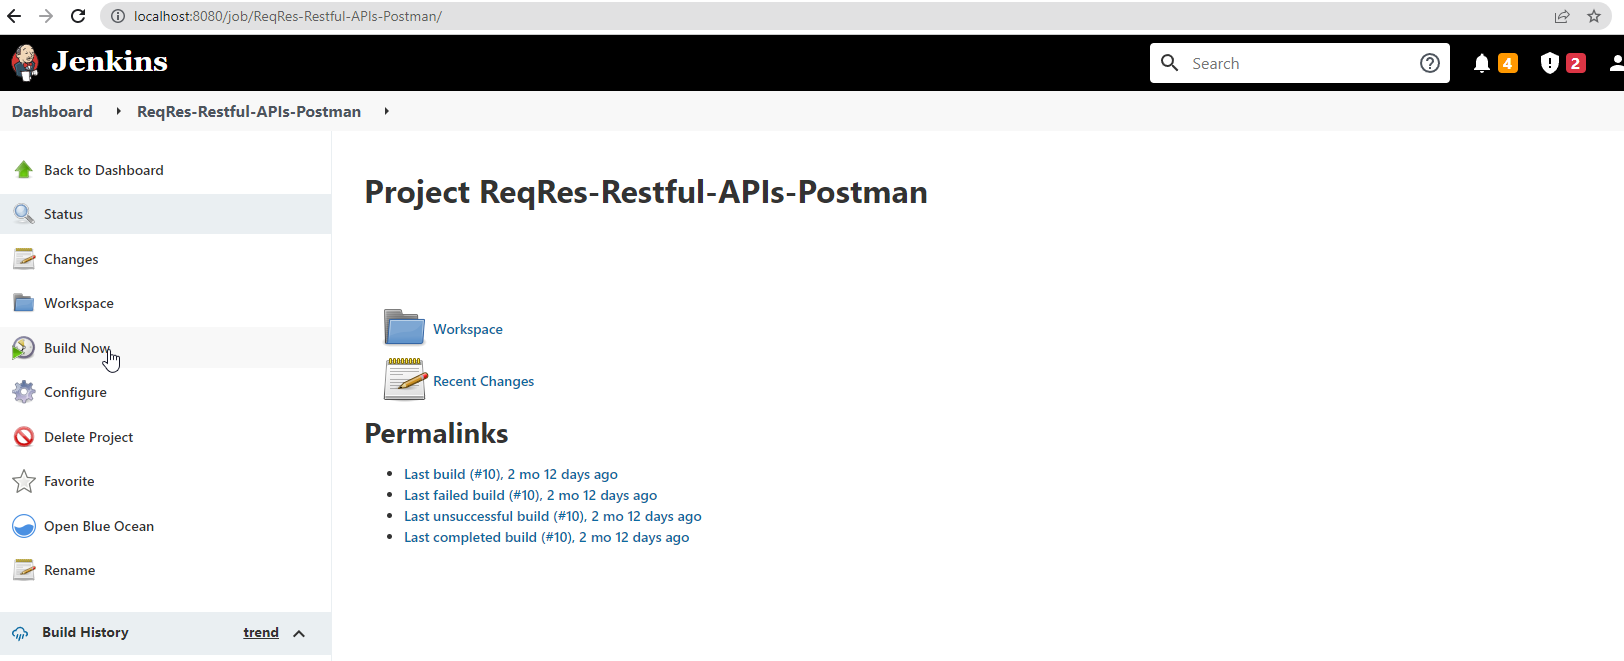
→ Click Build Now.
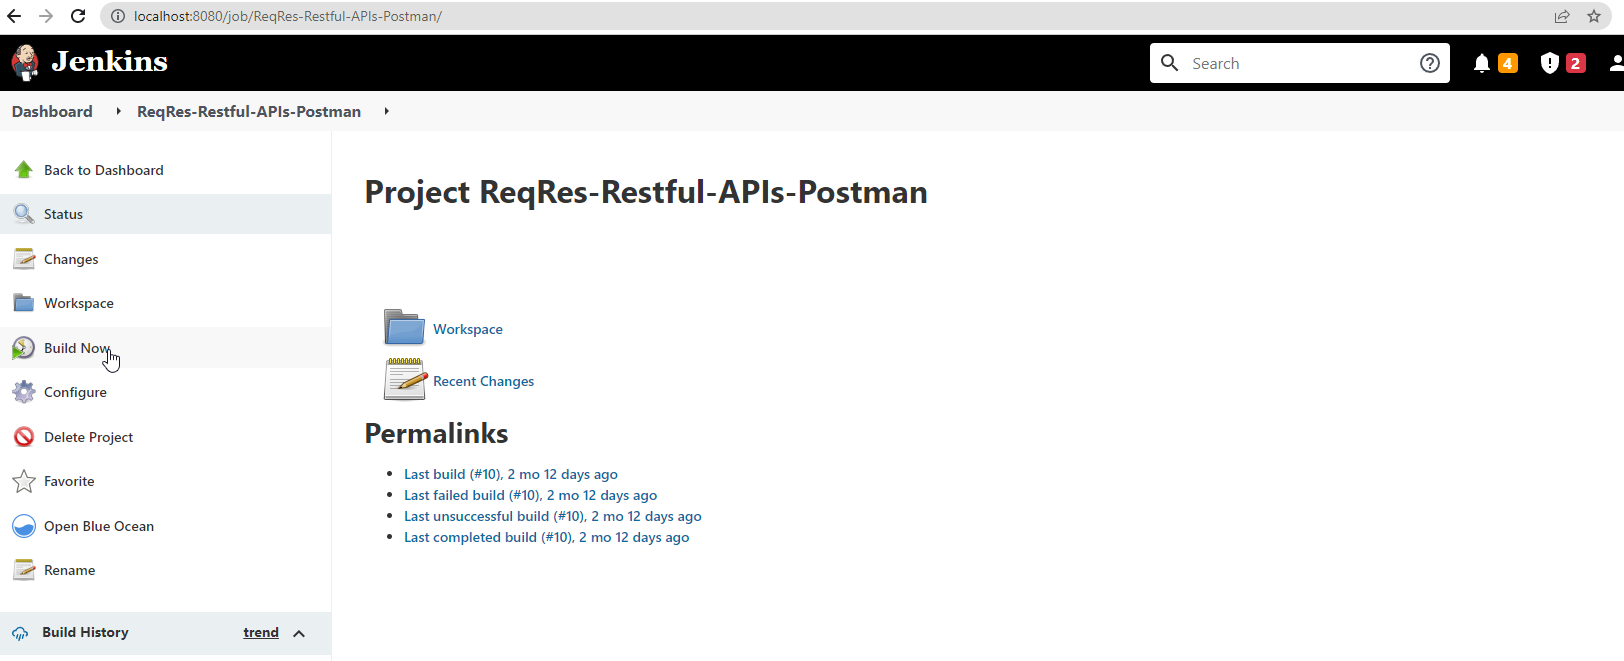
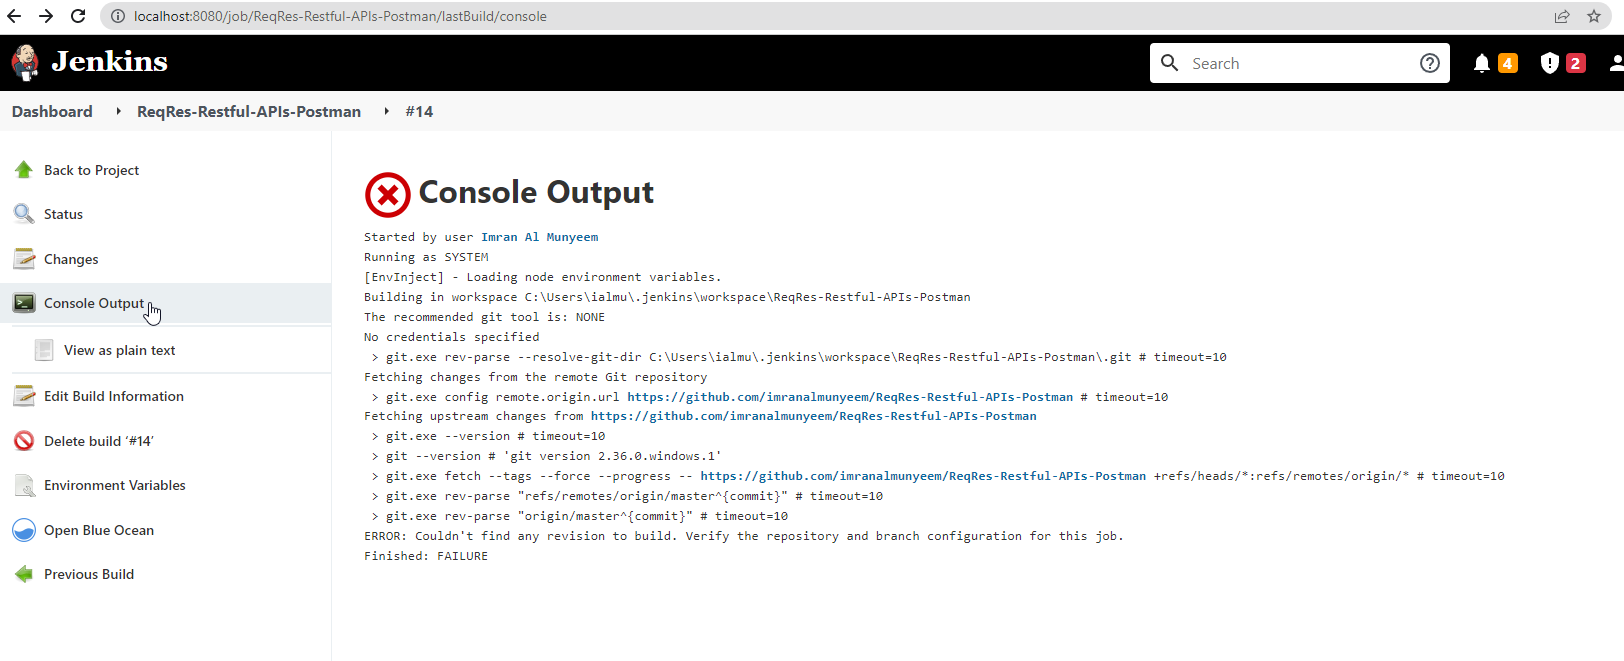
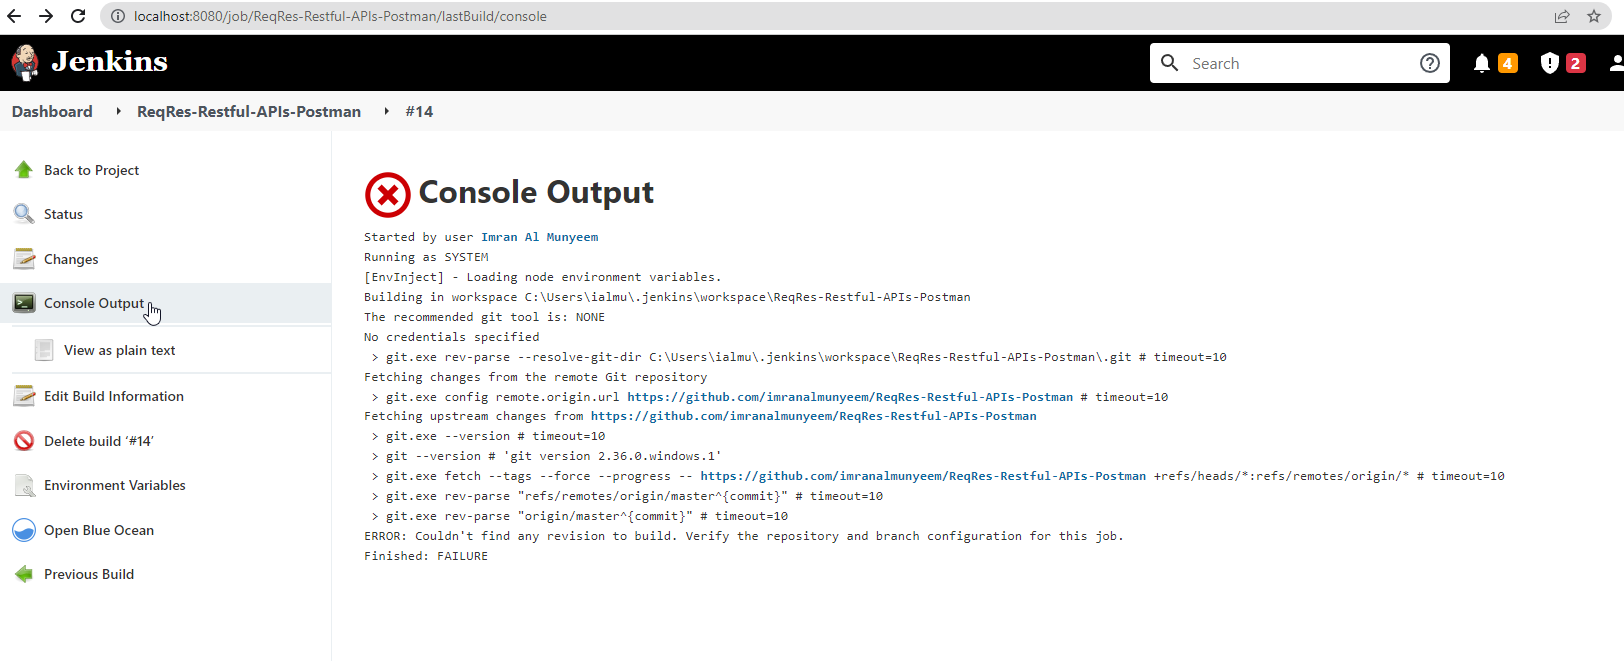
→ Click Console Output to watch the run; View as plain text gives the raw view.
Run from GitHub
Keeping the collection export in a Git repository — alongside the code it tests — is the scalable pattern: the tests are versioned, code-reviewed, and available to every build agent.
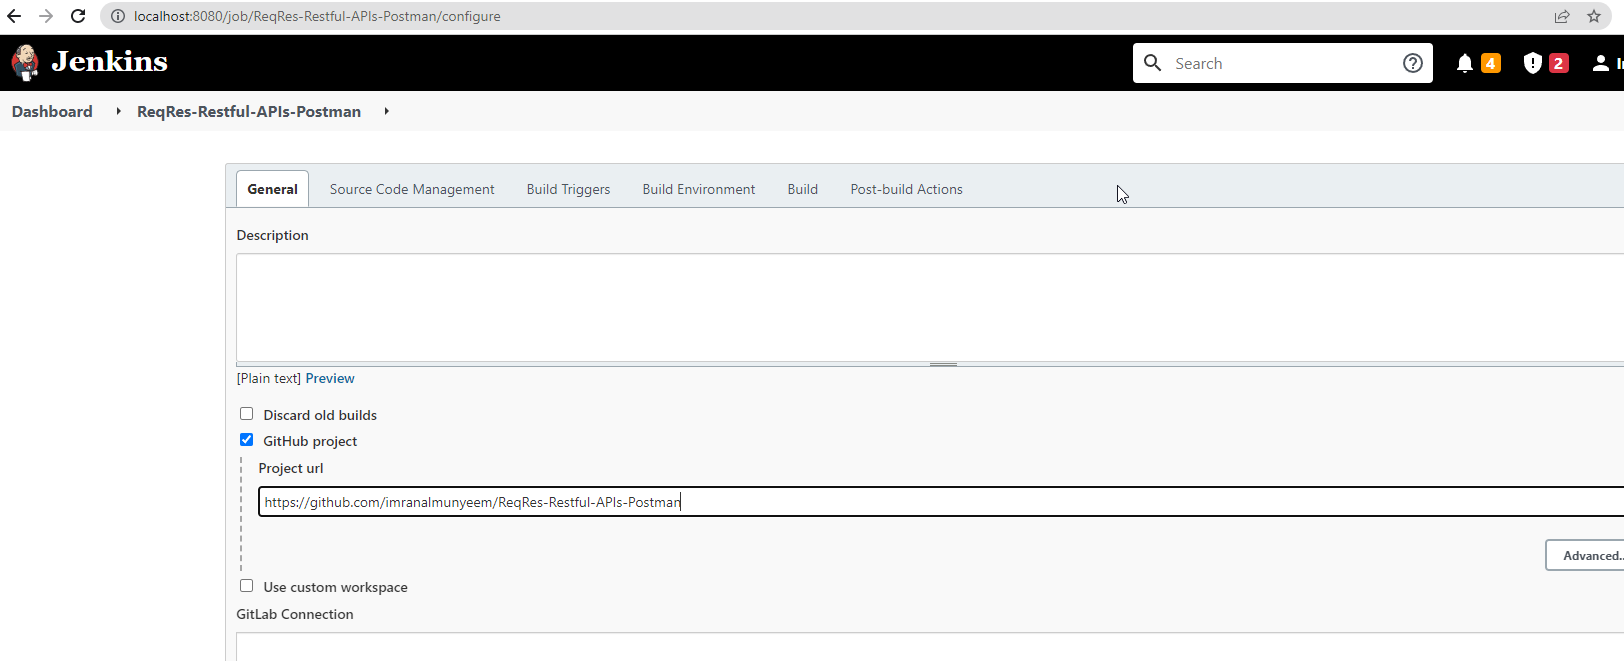
→ Tick GitHub project under General and enter the repository URL.
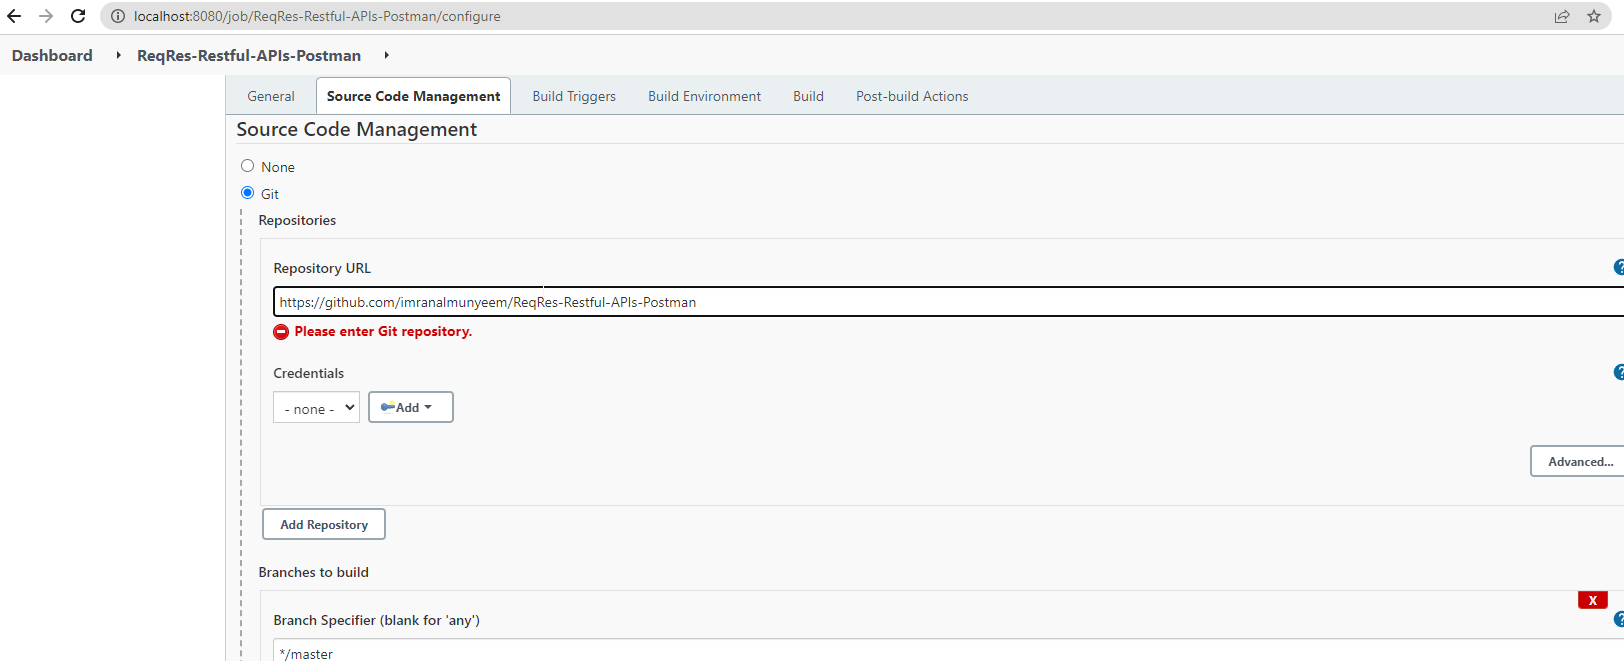
→ Set Source Code Management to Git and add the repository link. N.B.: add credentials if the repository is private.
→ Add the same build step as before — the collection is now checked out into the job's workspace, so the path is relative:
newman run "collections/MyCollection.postman_collection.json" -r cli,htmlextra
→ Click Build Now.
→ Review the Console Output as before.
Automate and Schedule
Put the Newman (or postman collection run) command in the build step, and every build runs the suite; because the runner exits non-zero on any failing test, a failing API test automatically fails the Jenkins build — exactly the safety net you want. To run on a schedule as well, open Build Triggers, tick Build periodically, and supply a cron expression — H 2 * * * runs the suite nightly around 2 a.m.
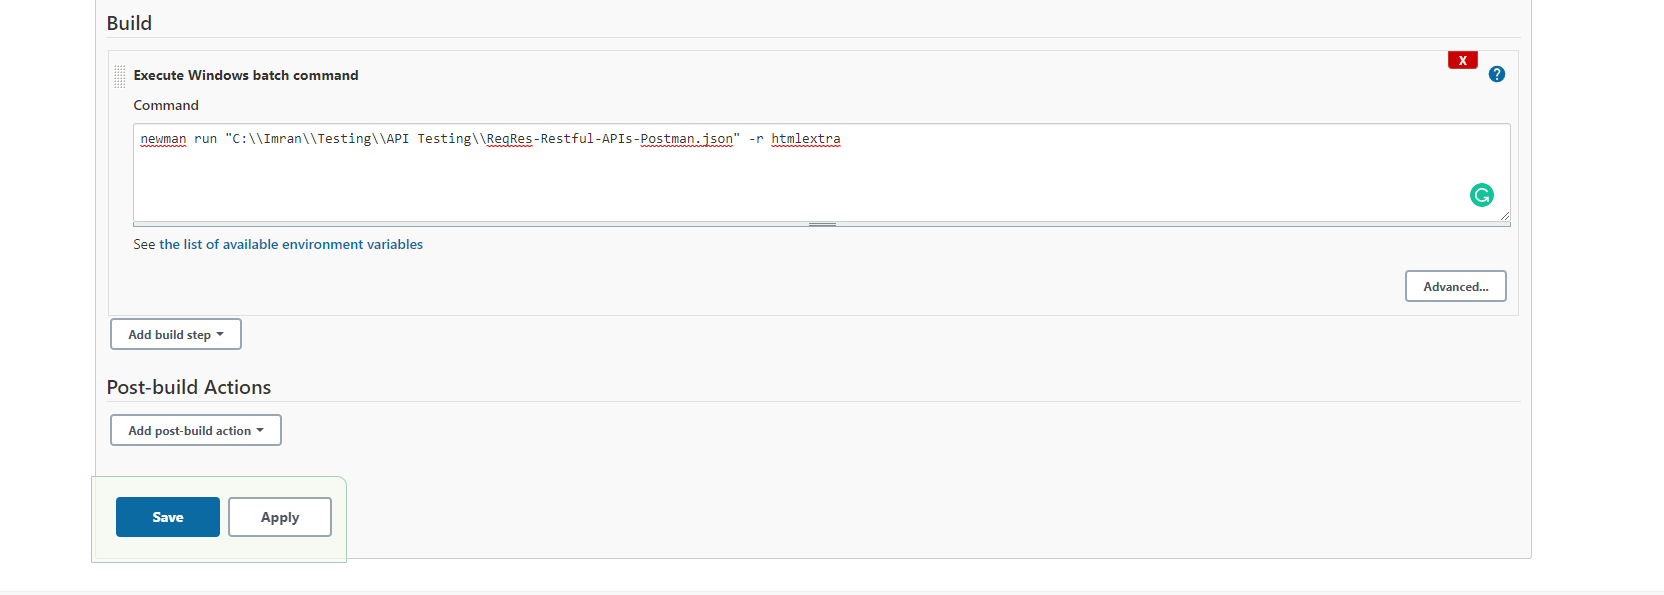
Handling secrets in Jenkins: never hard-code tokens in the build step. Store them in Jenkins Credentials, bind them to environment variables in the job, and pass them through: newman run ... --env-var "token=%API_TOKEN%" (Windows) or "token=$API_TOKEN" (shell). The token then never appears in the job configuration or the console log.
The Cloud-Native Alternative — GitHub Actions
If your code lives on GitHub, the same tests can run with no server to maintain at all. Create .github/workflows/api-tests.yml in the repository:
name: API Tests
on:
  push:
  schedule:
    - cron: "0 2 * * *"   # nightly at 02:00 UTC

jobs:
  postman-tests:
    runs-on: ubuntu-latest
    steps:
      - uses: actions/checkout@v4
      - uses: actions/setup-node@v4
        with:
          node-version: "lts/*"
      - name: Install Newman
        run: npm install -g newman newman-reporter-htmlextra
      - name: Run collection
        env:
          API_TOKEN: ${{ secrets.API_TOKEN }}
        run: >
          newman run collections/MyCollection.postman_collection.json
          -e environments/Staging.postman_environment.json
          --env-var "token=$API_TOKEN"
          -r cli,htmlextra
      - name: Upload report
        if: always()
        uses: actions/upload-artifact@v4
        with:
          name: newman-report
          path: newman/
Every push — and every night — GitHub spins up a clean runner, installs Newman, runs the collection, fails the build on any failing test, and attaches the HTML report to the run. The credential comes from the repository's encrypted Secrets, never from a file. The Postman CLI pattern is identical: store the Postman API key as a secret, postman login --with-api-key in one step, run the collection by ID in the next. GitLab CI, CircleCI, and Azure Pipelines follow the same recipe.
The finish line: with this chapter in place, your suite has completed the journey — from a request you clicked by hand in Chapter 4 to a gate that every code change must pass. One frontier remains: the AI now reshaping how the tests themselves get written.
Part VI — The AI Era
AI has changed how testers work — not by replacing the skills of Parts I–V, but by compressing the time they take. This part covers the AI capabilities built into Postman, the wider pattern of AI-assisted testing, and — just as importantly — where human judgement must stay in the loop.
AI-Assisted API Testing
Postbot: Postman's AI Assistant
Postbot is Postman's built-in AI assistant, available from the Postman footer. It understands the context of whatever you have open — the request, its response, your scripts — and acts on plain-English instructions. Its most useful skills for a tester:
Generate tests. Open a request, send it once so a response exists, open Scripts → Post-response, and invoke Postbot. Ask in natural language:
"Add tests for the status code, the content type, and that the response time is under 500 ms."
"Verify the response body has a
tokenfield and save it as a collection variable."
"Add a test that validates the response against its JSON schema."
Postbot writes the JavaScript directly into your script editor, using the same pm.test / pm.expect patterns from Chapter 5 — which is exactly why you learnt them by hand: so you can read, review, and correct what the AI writes.
Generate a whole test suite. From a collection's […] menu, choose Generate tests, and Postbot adds baseline tests — status, content type, response time, structure — to every request in the collection at once. For a large collection, hours of boilerplate become minutes of review.
Fix a failing script. When a test script throws an error, Postbot offers a Fix script action — it analyses the error, proposes a correction, and applies it on your approval. When a request itself fails, asking "What's wrong?" gets a context-aware diagnosis.
Document and visualise. Postbot can write documentation for a request or collection from its actual traffic, and can turn a JSON response into a table or chart on demand — genuinely useful when exploring an unfamiliar API.
Availability note: Postbot's packaging has changed over time — it began as a general feature and is now positioned as an add-on, with enterprise plans adding privacy guarantees (inputs not used for model training). Check your plan's current terms; you can also disable Postbot entirely in settings if your organisation requires it.
Beyond Postbot: the Wider AI Toolkit
AI requests. Postman can send requests directly to AI model providers — and to any OpenAI-compatible endpoint, including self-hosted and local models — via a dedicated AI request type. If your product exposes an LLM-backed API, you can test it with the same collections, environments, and scripts as any other endpoint. (Testing AI endpoints adds a twist worth knowing: responses are non-deterministic, so assertions shift from exact values to properties — structure, length bounds, required fields, forbidden content.)
Agent Mode and MCP. Postman's Agent Mode takes multi-step actions on your behalf — building collections, running them, analysing results, even raising Jira or GitHub issues with context attached. Through Postman's MCP server, external AI agents can be given structured access to your APIs, so an AI coding assistant can run a collection or generate client code that matches how your API actually behaves.
General-purpose AI assistants. Outside Postman, LLM assistants are now routine companions for testers: generating edge-case ideas from an OpenAPI specification, drafting a CSV of boundary values for a data-driven run, explaining an unfamiliar auth flow, or converting a cURL command into a collection request. Treat them as a fast junior colleague — enormously productive, occasionally confidently wrong.
Keeping Judgement in the Loop
AI-generated tests inherit a specific weakness: they validate what the response is, not what it should be. If your API wrongly returns 200 for an invalid payload, an AI generating tests from the observed response will happily assert that the bug is correct behaviour — enshrining the defect as the expected result. So:
- Review every generated assertion against the specification or requirement, not the current response.
- Keep negative tests deliberate. AI suggestions skew towards happy paths; wrong passwords, missing fields, expired tokens, and malformed bodies still need a human's adversarial instinct — the Chapter 8 checklist does not automate away.
- Never paste secrets into prompts. Tokens, customer data, and internal URLs do not belong in any AI conversation unless your plan contractually protects them.
- Own the suite. A test you cannot read is a test you cannot trust. Everything in Chapter 5 exists precisely so that AI accelerates your understanding rather than replacing it.
Used this way, AI does for test authoring what Newman did for test execution: it removes the drudgery and leaves you the judgement. That division of labour — machines for repetition, humans for meaning — has been the story of this book from the first assertion to the last pipeline, and it is the safest prediction about whatever comes next.
Part VII — Reference
The remaining chapters are built for looking things up: the questions interviewers actually ask, the full HTTP status code table, and a glossary of every term this book leans on.
Interview FAQ
Thirty-seven questions that recur in API-testing interviews and code reviews, with answers reflecting current Postman behaviour. Use them as a self-test: read the question, answer aloud, then compare.
1. What is Postman?
Postman is an API platform for designing, building, testing, documenting, and iterating on APIs. Using Postman, we can send HTTP/HTTPS (and gRPC, GraphQL, WebSocket, and MQTT) requests to a service and inspect the responses to verify the service behaves as intended.
2. Why Postman?
It is free to start, with paid plans adding team features; it supports REST, SOAP, GraphQL, gRPC, and WebSocket calls; it is scriptable in JavaScript and extensible through the Postman API; it integrates with any CI/CD service through the Postman CLI or Newman; and its AI assistant, Postbot, can generate tests, fix scripts, and write documentation.
3. What is an API?
An Application Programming Interface is a contract that lets a client use a system's data or functionality: the client sends a request, the API receives it, the system retrieves or manipulates the appropriate data, and a response returns.
4. What are the core components of an HTTP request?
Five elements: the HTTP method (GET, POST, PUT, PATCH, DELETE); the URI describing the resource; the HTTP version; the request headers (for example Content-Type: application/json); and the payload — the request body carrying the message content.
5. What are the core components of an HTTP response?
Four elements: the status code (for example 404 Not Found, 200 OK); the HTTP version; the response headers (content type, length, date, server); and the response body containing the requested data.
6. What are the HTTP response code classes?
Five classes: informational (100–199), successful (200–299), redirection (300–399), client error (400–499), and server error (500–599). The full table is in Appendix A.
7. Which status codes should a tester know cold?
200 OK, 201 Created, 204 No Content; 301/302 redirects; 400 Bad Request, 401 Unauthorized, 403 Forbidden, 404 Not Found, 409 Conflict, 429 Too Many Requests; 500 Internal Server Error, 502 Bad Gateway, 503 Service Unavailable.
8. What API information is exposed in browser developer tools?
Request headers, the response body, and response cookies — everything in the Network tab.
9. How do you bring a request from browser dev tools into Postman?
Copy as cURL in the Network tab, then paste into Postman's import — it reconstructs the full request, headers and all.
10. How does Basic authentication encode credentials?
Basic auth encodes username:password in Base64 — a textual encoding (not encryption) that travels safely inside an HTTP header, which is why it is only acceptable over HTTPS. Postman generates it automatically when you choose Basic Auth in the Authorization tab; modern Postman also supports Bearer tokens, API keys, OAuth 2.0 with automatic token handling, JWT, AWS Signature, and more.
11. Why Base64 rather than plain text?
Base64 represents data using a fixed set of 64 characters that survive any HTTP header or form encoding. Remember it is trivially reversible — it provides transport safety, not secrecy.
12. What is an environment in Postman?
A named set of key–value pairs. Multiple environments — development, staging, production — can be switched instantly, running the same collection against each.
13. Can global variables have duplicate names?
No — globals exist outside any environment, so names are unique. Environment variables can share a name across different environments; indeed they should, since identical names with different values is what makes environment switching work.
14. If a global and an environment variable share a name, which wins?
The narrower scope. Postman's precedence, narrowest first: local > data > environment > collection > global.
15. What is a Postman collection?
A group of requests organised into folders — and the unit of automation: collections are what runners, monitors, mocks, and CI pipelines operate on.
16. What are Postman monitors?
Scheduled collection runs on Postman's cloud that alert you when tests fail — a regression suite converted into a continuous health check, with results shared by email or chat integrations.
17. What is the collection runner used for?
Executing a collection's requests in sequence, including data-driven testing — multiple iterations, each drawing variables from a row of a CSV or JSON data file — and, on paid plans, performance testing with simulated virtual users.
18. Can local variables be used in monitors?
Monitors use the environment attached to them; they do not see your local session state, and locally-scoped values are not carried over. Ensure every variable the collection needs has a synced value the monitor can read.
19. Why use team workspaces in a company?
A team workspace is a shared, access-controlled repository of collections and environments: work syncs instantly, everyone operates on the live version with history and forking, and permissions follow team roles.
20. What should never be stored in synced Postman variables?
Real credentials in initial values — initial values sync to Postman's servers and are visible to collaborators. Keep secrets in current values (local only), mark them with the secret type, use Postman Vault for the most sensitive, and in CI inject credentials from the pipeline's secret store.
21. When do you use global, collection, and local variables?
Globals for prototyping and passing data between requests quickly; collection variables for constants that travel with the suite (API versions, fixed IDs) and for values that must work without any environment; locals for values scoped to a single request or iteration, overriding everything else temporarily.
22. How are local variables removed?
Automatically, when the run finishes.
23. How do you stop a collection run from a script?
pm.execution.setNextRequest(null);
The older postman.setNextRequest(null) still works; pm.execution.setNextRequest is the current API — and with a request name instead of null, it redirects the run's flow.
24. What is the difference between form-data and x-www-form-urlencoded?
x-www-form-urlencoded URL-encodes simple key–value text pairs; form-data uses multipart encoding and can carry files and binary content.
25. Where are query parameters stored in a GET request?
In the URL, after the ? — for example /users?page=2&limit=50.
26. How do you access a Postman variable?
In URLs, headers, and bodies: {{variableName}}. In scripts: pm.environment.get(...), pm.collectionVariables.get(...), pm.globals.get(...), or the scope-walking pm.variables.get(...).
27. What status code should a POST with invalid parameters return?
400 Bad Request — and a useful error body. A 500 for bad input is itself a bug: the server failed to validate.
28. How can you run a request 100 times?
Set Iterations to 100 in the collection runner — or from the command line, newman run collection.json -n 100.
29. How do you organise requests in Postman?
With collections, and folders inside collections — ideally one folder per resource or feature, so folder-level scripts apply shared logic to the right group.
30. Which language do Postman scripts use?
JavaScript, executed in Postman's Node.js-based sandbox, with the Chai.js assertion library built in.
31. What executes first in a collection run?
Collection-level pre-request scripts, then folder-level, then request-level; after the response, post-response scripts run in the same collection → folder → request order.
32. Which JavaScript libraries are available in Postman scripts?
Lodash, Moment, Chai, cheerio, ajv (JSON-schema validation), crypto-js, uuid, and xml2js, among others — plus the Faker library behind dynamic variables like {{$randomEmail}}.
33. Which tools run Postman collections in CI systems?
Newman (the classic open-source runner) and the Postman CLI (the official successor, which can run collections directly from a workspace and report results back to Postman). Newman supports collection format v2/v2.1 only; the newer v3 format requires the Postman CLI.
34. How do you log and inspect requests during debugging?
The Postman Console shows every request exactly as sent — resolved variables, final headers — plus script console.log output. In CI, the runners print full logs, and reporters like htmlextra capture them in HTML reports.
35. What is a GUID/UUID, and how does Postman generate one?
A Globally Unique Identifier — hexadecimal digits separated by hyphens, designed never to collide. The dynamic variable {{$guid}} generates a fresh one per request, ideal for unique test data.
36. What is Postbot?
Postman's built-in AI assistant: it generates test scripts from natural-language prompts, creates test suites for whole collections, fixes failing scripts, writes API documentation, visualises response data, and answers Postman usage questions — all with awareness of the request you have open.
37. Should AI-generated tests be trusted as-is?
No. AI-generated tests validate the response the API currently gives, not the behaviour the specification demands — so they can enshrine bugs as expected results. Review generated assertions against requirements, keep negative tests deliberate, and never include secrets in prompts.
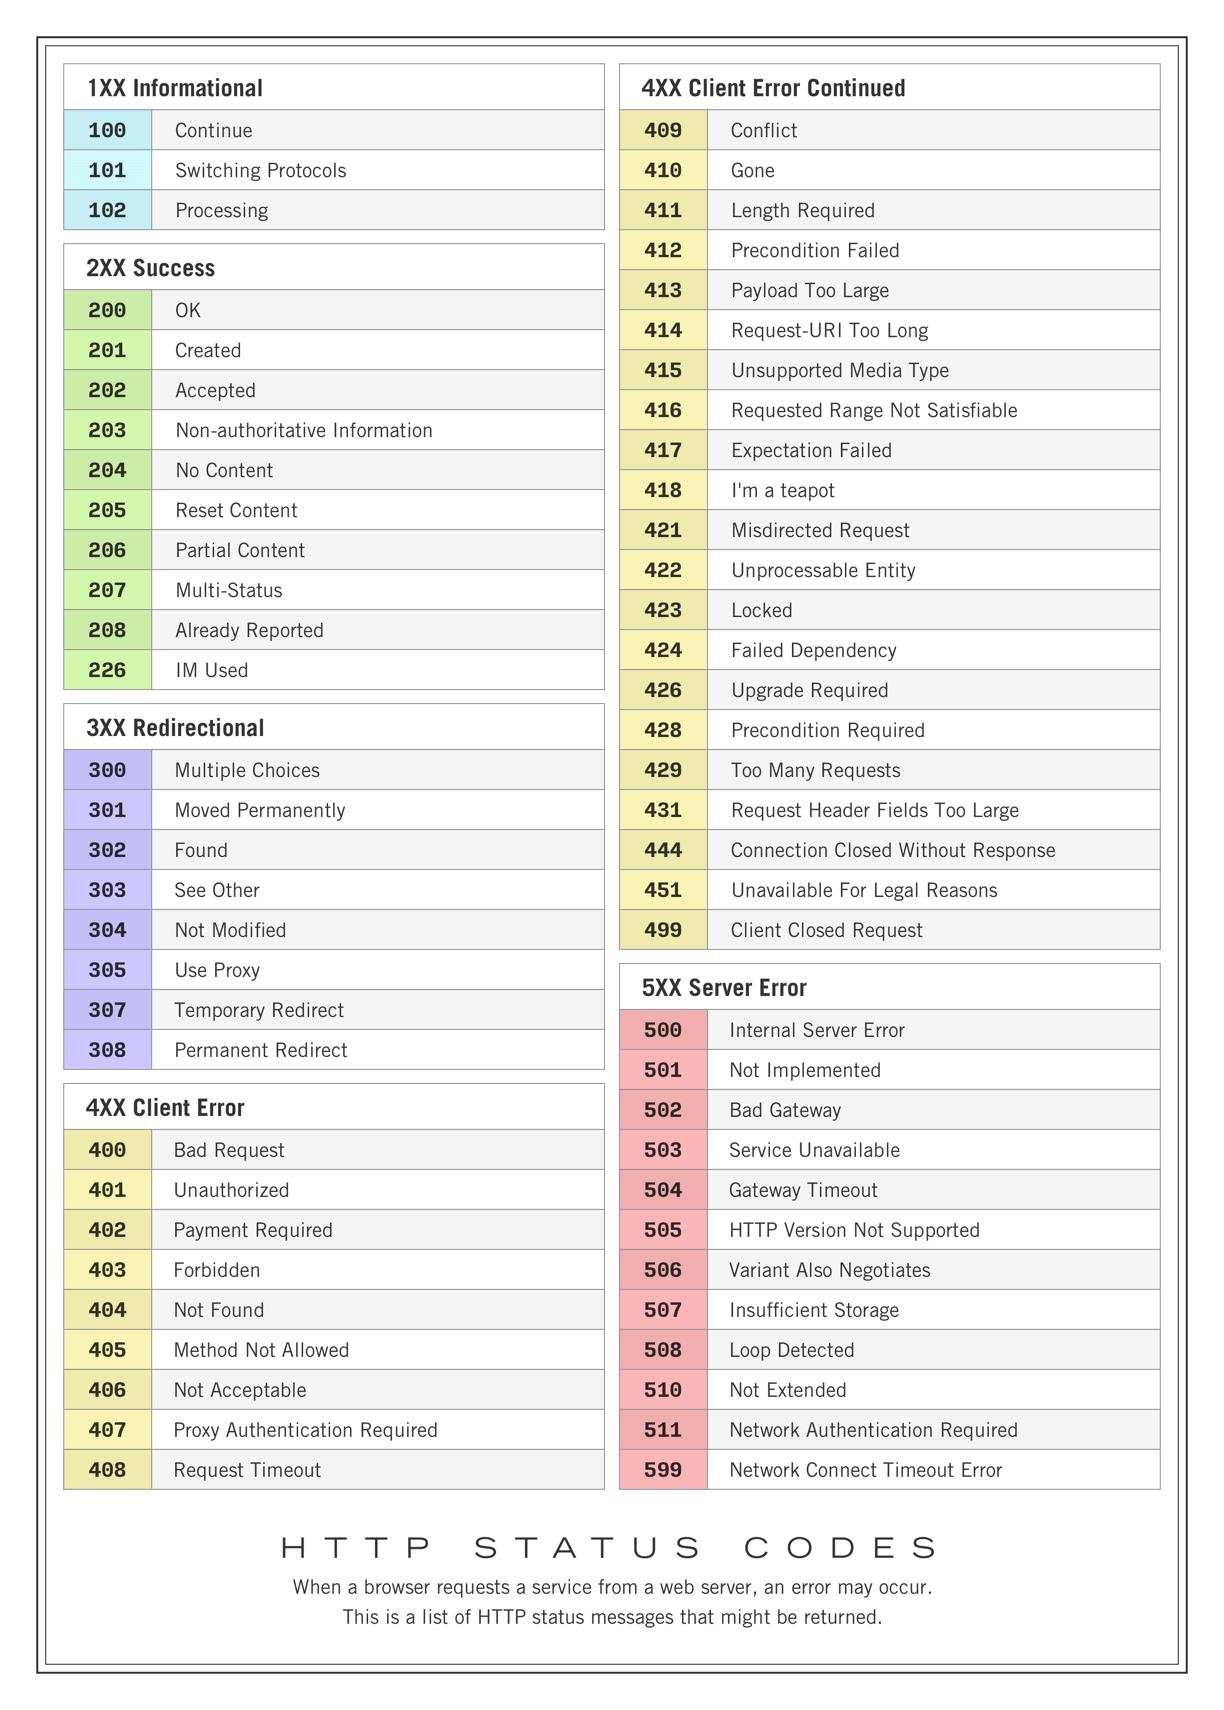
Appendix A: HTTP Status Code Reference
The complete table, grouped by class. The handful in bold in Chapter 1 cover daily work; the rest reward recognition — a 409 Conflict or 429 Too Many Requests in a test run tells you exactly where to look.
Glossary
API (Application Programming Interface) — the contract letting one piece of software use another; in this book, almost always a web API spoken over HTTP.
Assertion — a single checked expectation inside a test, such as pm.expect(status).to.eql(200).
Base64 — a reversible textual encoding using 64 characters; used by Basic auth, it provides transport safety, not secrecy.
Chai.js — the assertion library built into Postman's script sandbox, providing the readable expect(...).to... syntax.
CI/CD (Continuous Integration / Continuous Delivery) — the practice of automatically building and testing every code change, and keeping software releasable at all times.
Collection — Postman's grouping of requests into a runnable, shareable, documentable unit; the test suite's container.
Collection Runner — the engine that executes a collection's requests and tests in sequence, manually, on a schedule, or via CLI.
Contract testing — verifying that a response's structure (fields, types, formats) matches an agreed schema, protecting the API's consumers.
Data-driven testing — running the same requests once per row of a data file, with {{column}} variables resolved from each row.
Endpoint — a specific URL (plus method) exposed by an API, such as GET /users/42.
Environment — a named set of Postman variables representing one deployment target (staging, production) and switchable in one click.
Flaky test — a test that sometimes fails without any code change; the most corrosive defect a suite can have.
Idempotent — an operation that produces the same result however many times it is repeated; GET, PUT, and DELETE are meant to be idempotent, POST typically is not.
JSON (JavaScript Object Notation) — the human-readable data format of modern APIs: nested objects, arrays, strings, numbers, booleans.
JWT (JSON Web Token) — a signed token format widely used for API authentication, carried in the Authorization: Bearer header.
Mock server — a Postman-hosted URL that serves your saved response examples, letting consumers and tests work before (or without) the real API.
Monitor — a scheduled cloud run of a collection with alerting; a regression suite on patrol.
Newman — the classic open-source command-line runner for Postman collections (v2/v2.1 format), famed for its htmlextra HTML reports.
OAuth 2.0 — the standard delegated-authorisation framework; Postman can drive its token flows automatically.
OpenAPI (Swagger) — the standard machine-readable format for describing REST APIs; importable into Postman as a ready-made collection.
Payload — the body of a request or response; the data being carried.
Postbot — Postman's built-in AI assistant for generating tests, fixing scripts, documenting, and visualising.
Postman CLI — the official command-line runner, able to run collections directly from a workspace and report results to Postman's cloud; required for the v3 collection format.
Pre-request script — JavaScript that runs before a request is sent (Scripts → Pre-request); the home of setup logic.
Post-response script — JavaScript that runs after the response arrives (Scripts → Post-response); the home of tests.
Regression testing — re-running existing tests to confirm that what worked yesterday still works today.
REST (Representational State Transfer) — the dominant architectural style for web APIs: resources at URLs, manipulated with standard HTTP methods.
Schema validation — asserting that a JSON body conforms to a JSON Schema; Postman ships the ajv validator for this.
Status code — the three-digit result summary of every HTTP response; see Appendix A.
Test pyramid — the strategy model placing many fast unit tests at the base, API/service tests in the middle, and few end-to-end UI tests at the top.
Variable scope — the level at which a Postman variable lives; precedence, narrowest first: local > data > environment > collection > global.
Workspace — Postman's top-level container for collections, environments, mocks, and monitors; personal, private, team, or public.
About the Author
Imran Al Munyeem is a PhD researcher in Computer Science at Nottingham Trent University, specialising in cybersecurity, hybrid cyber range architectures, and AI-assisted security testing. He holds an MSc in Software Engineering and Applications with Distinction from the University of Bedfordshire, and spent several years in industry as a software test engineer, working across test automation, API testing, CI/CD, performance testing, and security assessment. He is an IEEE conference author, and his research interests include large language models for software testing.
His research, projects, and contact details are at https://imranalmunyeem.com.
Thank you for reading. If this book helped you, please consider leaving a review — it makes a real difference for independent authors, and it helps the next tester find their way here.